
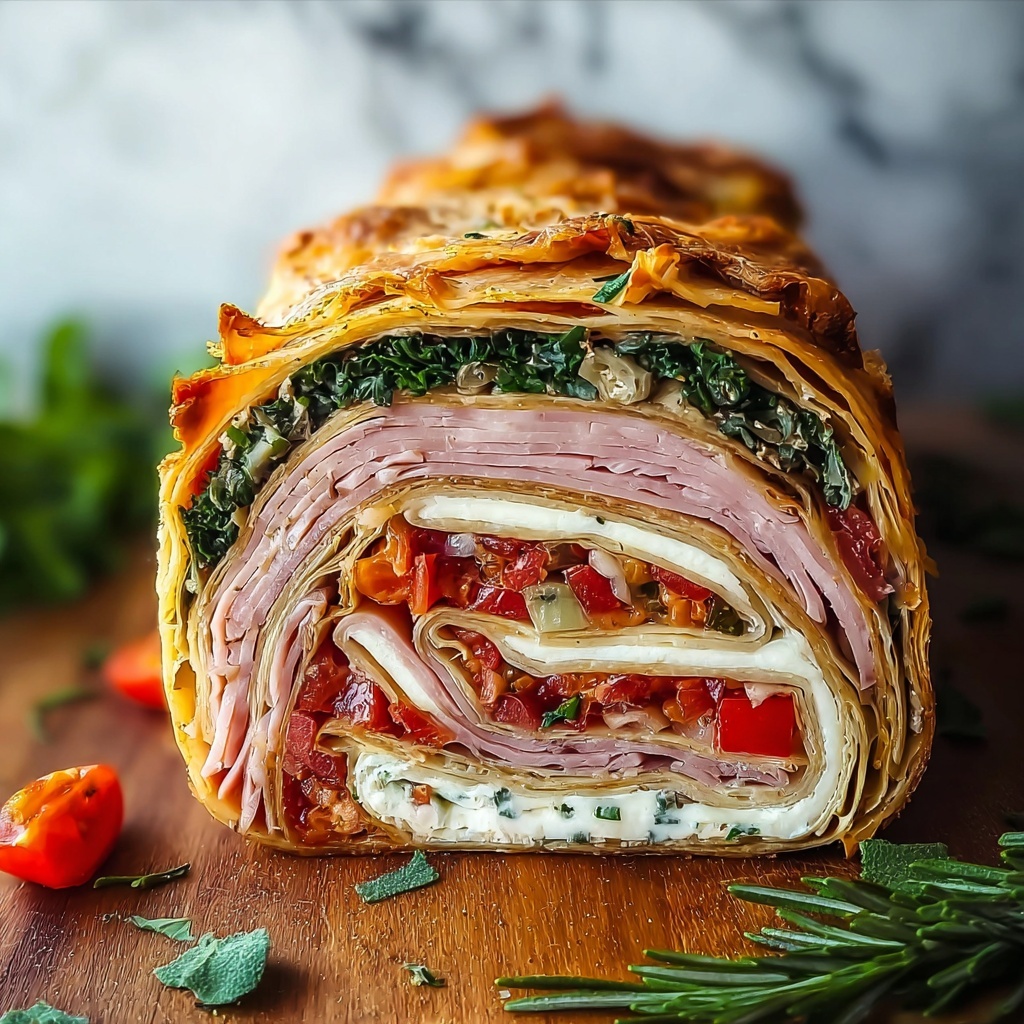
If you’re craving a sandwich that’s equal parts impressive and effortless, the Pressed Italian Picnic Sandwich Loaf Recipe is an absolute must-try. This vibrant loaf is packed with layers of savory salami, classic ham, fresh greens, and melting mozzarella, all held together by a sturdy ciabatta or sourdough crust and infused with the bold flavors of olive tapenade. Perfect for summer gatherings, this recipe transforms simple ingredients into a stunning centerpiece that’s as delicious to eat as it is fun to share. The long pressing time allows the flavors to meld beautifully, resulting in a sandwich loaf bursting with authentic Italian charm and picnic-perfect ease.
Ingredients You’ll Need
Gathering the ingredients for this Pressed Italian Picnic Sandwich Loaf Recipe is delightfully straightforward, but each component plays a pivotal role in crafting that perfect balance of flavor, texture, and color. From the hearty bread that forms the loaf’s foundation to the vibrant veggies and rich cheeses, every piece works harmoniously to create this mouthwatering masterpiece.
- Sturdy ciabatta or sourdough loaf: Choose a loaf that can hold its shape well without becoming soggy when filled.
- Olive tapenade (1 cup): Adds a savory, briny punch that’s essential for that authentic Italian taste.
- Salami slices (8): Provides rich, flavorful cured meat with a satisfying bite.
- Ham slices (8): The classic complement to salami, delivering subtle sweetness and a tender texture.
- Peppers (1 cup): Fresh or roasted, they bring a pop of color and a hint of sweetness; jalapeños add a kick of heat.
- Spinach (2 cups): Fresh spinach offers a mild, leafy crunch; arugula is a great alternative for peppery notes.
- Drier mozzarella or provolone (8 ounces): These cheeses provide structure and melt wonderfully during pressing.
- Weighting items (skillet, canned goods): Necessary for pressing the sandwich loaf to compact and enhance flavor melding.
How to Make Pressed Italian Picnic Sandwich Loaf Recipe
Step 1: Prepare the Bread Bowl
Begin by slicing off the top quarter of your ciabatta or sourdough loaf. With a gentle touch, scoop out the inner bread, leaving about a 1-inch-thick shell all around. This sturdy bread wall will cradle the fillings and prevent sogginess while providing enough structure to hold the loaf together once pressed. Think of this shell like a savory bread bowl—perfect for loading with delicious layers.
Step 2: Spread the Olive Tapenade
Generosity is key here. Spread a thick layer of olive tapenade on the bottom and inside of the hollowed loaf, as well as on the underside of the sliced-off top. This briny, flavorful spread not only infuses the bread with Mediterranean zest but also acts as a flavor anchor for the layers that follow.
Step 3: Layer the Meats, Veggies, and Cheese
Start by layering in your slices of salami and ham, laying them in tightly to avoid any gaps. Next, add your choice of peppers—whether fresh to keep things bright or roasted for a deeper, smoky flavor—and greens like spinach or arugula for a burst of freshness. Top it all off with those slices of mozzarella or provolone, which will provide a slightly creamy texture and hold the loaf together as it presses. The trick here is to pack everything firmly without overstuffing, so the sandwich compresses nicely.
Step 4: Press and Refrigerate the Loaf
Once your layers are complete, crown the loaf with the bread top you saved earlier. Wrap the entire sandwich loaf tightly in plastic wrap to keep it compact and fresh. Then place your weighting items—like a heavy skillet or some canned goods—on top of the loaf to press it down firmly. Refrigerate this weighted sandwich for at least 8 hours. This pressing time is what transforms the loaf, marrying the flavors and making slicing a breeze.
Step 5: Slice and Serve
When ready to serve, unwrap the loaf carefully. For an extra touch of flavor and shine, brush the top with a bit of olive oil. Then slice the loaf into wedges or thick slices, much like a pie, so everyone gets a perfect cross-section of the beautiful layers inside. This is the moment where your masterpiece really shines—packed with Italian picnic goodness in every bite.
How to Serve Pressed Italian Picnic Sandwich Loaf Recipe

Garnishes
Adding garnishes to your pressed loaf can elevate presentation and flavor. Consider fresh basil leaves for aroma, or sprinkle a pinch of crushed red pepper flakes for an optional spicy kick. Thinly sliced olives or a drizzle of balsamic glaze offer an elegant finish that complements the layers within.
Side Dishes
This sandwich loaf pairs beautifully with light and fresh sides to balance its richness. Think a crisp arugula salad tossed with lemon vinaigrette, or a bowl of marinated olives and cherry tomatoes. Potato chips or a simple pasta salad also make for classic picnic companions, rounding out your spread without overpowering the loaf’s flavors.
Creative Ways to Present
For a fun twist, try serving your loaf on a large wooden board adorned with small bowls of extra tapenade, mustard, and pickles, letting guests customize their slices. Another idea is to transform leftovers into sliders by cutting thinner pieces and serving on mini buns. This creative approach keeps the festive spirit alive while ensuring no crumb goes to waste.
Make Ahead and Storage
Storing Leftovers
Once you’ve enjoyed your picnic, wrap any leftover sandwich loaf tightly in plastic wrap or store it in an airtight container. Keep it refrigerated where it will stay fresh for up to 3 days. Its pressed form actually helps maintain moisture and texture, meaning the loaf holds up nicely over time.
Freezing
To freeze, slice the loaf first and wrap individual pieces in parchment and then aluminum foil before placing them in a freezer-safe bag. This method prevents freezer burn and lets you thaw only what you need. Frozen slices are best consumed within 1 month for optimal flavor and texture.
Reheating
When ready to enjoy leftovers, gently reheat slices in a preheated oven at 350°F for about 10–15 minutes, just until warmed through. This revives the cheeses and crunchiness of the bread without making it soggy. Avoid microwaving as it can lead to a less satisfying texture.
FAQs
Can I use other types of bread for this recipe?
Absolutely! While ciabatta and sourdough work best due to their sturdy crusts, you can experiment with other crusty breads. Just make sure the bread is strong enough to withstand hollowing and pressing without falling apart.
Is olive tapenade necessary, or can I substitute it?
Olive tapenade adds a wonderful, salty complexity, but if you don’t have it on hand, a spread of pesto or a flavored oil blend can work as an alternative. Just choose something that complements the meat and cheese without overpowering them.
Can I make this sandwich vegetarian?
Yes! Simply swap the salami and ham for slices of roasted vegetables like eggplant or zucchini, and add additional cheese or marinated artichokes for heartiness. The layering and pressing technique still shines with vegetarian fillings.
How thick should the cheese slices be?
A thickness of about 1/8 inch is perfect—thick enough to give good coverage and structure but thin enough to meld smoothly with the other layers when pressed.
Why is pressing the loaf important?
Pressing compacts the ingredients, melding their flavors and making the sandwich easier to slice and eat without falling apart. It also softens the bread slightly while preventing sogginess, resulting in a cohesive, delicious loaf.
Final Thoughts
The Pressed Italian Picnic Sandwich Loaf Recipe truly transforms an ordinary gathering into a festive occasion with minimal fuss and maximum flavor. Whether you’re packing it up for a sunny day at the park or serving it at a backyard party, this sandwich loaf brings people together over layers of delicious Italian-inspired goodness. Give it a try, and you might just discover your new favorite picnic staple.
Print
Pressed Italian Picnic Sandwich Loaf Recipe
- Prep Time: 30 minutes
- Cook Time: 0 minutes
- Total Time: 8 hours 30 minutes
- Yield: 8 servings
- Category: Sandwich
- Method: No-Cook
- Cuisine: Italian
Description
This Pressed Italian Picnic Sandwich Loaf is an ideal savory treat for summer gatherings, combining robust Italian meats, fresh greens, melted cheese, and flavorful olive tapenade inside a sturdy ciabatta or sourdough loaf. The sandwich is carefully pressed overnight to meld the flavors and hold its shape for easy slicing and serving, making it a perfect make-ahead picnic centerpiece.
Ingredients
Sandwich Loaf
- 1 loaf sturdy ciabatta or sourdough (Ensure it holds its shape without getting soggy)
Spread & Filling
- 1 cup olive tapenade (Store-bought or homemade)
- 8 slices salami (Rich in flavor)
- 8 slices ham (Classic choice)
- 1 cup peppers (Fresh or roasted; jalapeños for heat)
- 2 cups spinach (Consider arugula for a peppery twist)
- 8 ounces drier mozzarella or provolone (For structural integrity)
Other
- 1 set weighting items (skillet, canned goods) (Necessary for pressing down the loaf)
Instructions
- Prepare Bread Bowl: Slice off the top quarter of the loaf and gently hollow out the insides, leaving a 1-inch thick shell to hold the fillings without breaking.
- Spread Tapenade: Generously spread olive tapenade on the bottom and the inside of the top piece to add moisture and flavor.
- Layer Ingredients: Layer the salami, ham, peppers (fresh or roasted), spinach or arugula, and the sliced drier mozzarella or provolone tightly inside the hollowed bread shell to create a compact sandwich.
- Press Loaf: Replace the top piece of the loaf, wrap the whole sandwich tightly with plastic wrap or foil, place a heavy weighted item such as a skillet or canned goods on top, and refrigerate for at least 8 hours to press and meld flavors.
- Slice and Serve: After pressing, unwrap the loaf, brush the outside with olive oil to add shine and flavor, and slice into wedges for serving at your picnic or gathering.
Notes
- Use a sturdy bread like ciabatta or sourdough to avoid sogginess.
- Olive tapenade can be store-bought or homemade for customization.
- For extra flavor, use grilled peppers or substitute arugula for spinach for a peppery bite.
- The pressing step helps compact ingredients and improves flavor melding but requires planning ahead due to the refrigeration time.
- If you prefer a spicier sandwich, include jalapeños or other hot peppers in the filling.


