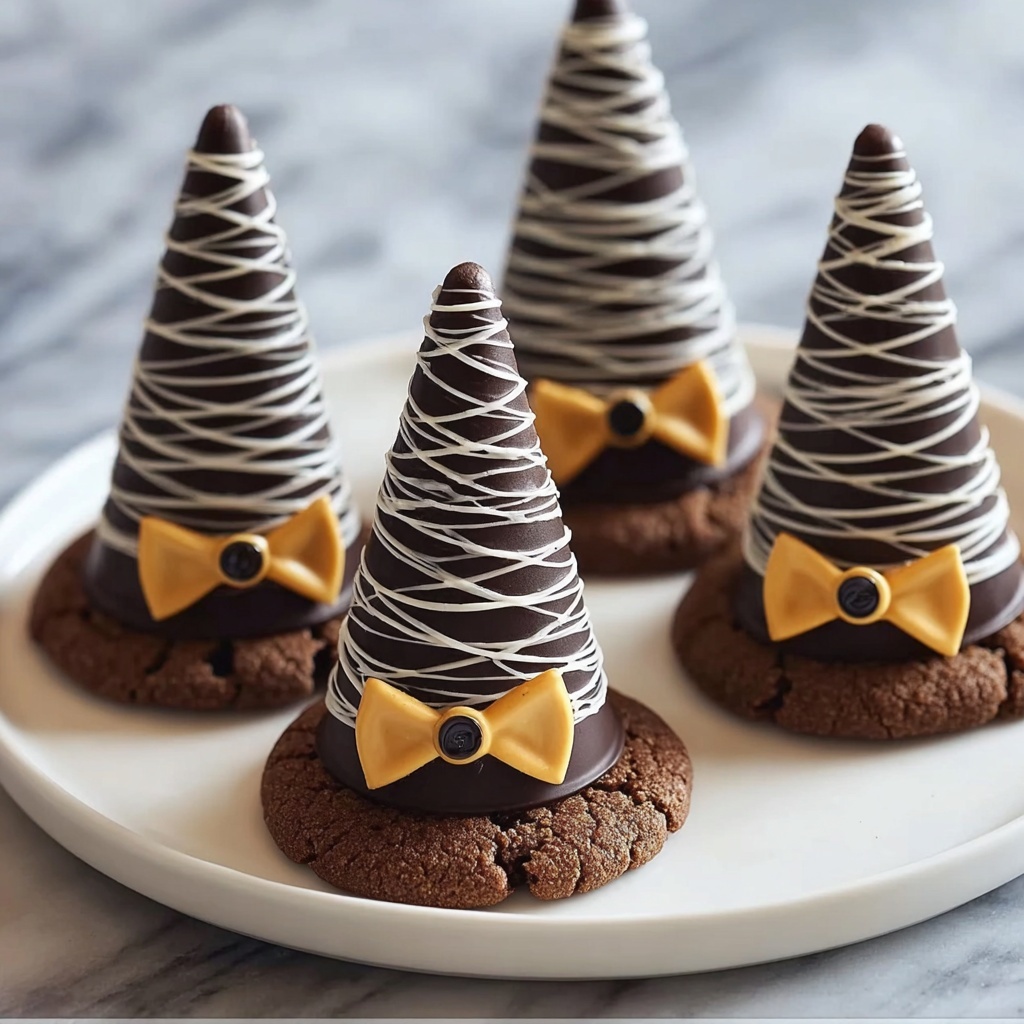
If you’re on the hunt for a delightful and spooky treat, this Halloween Witch Hat Cookies Recipe will absolutely enchant your taste buds and wow everyone at your party. These charming confections bring together the perfect combo of rich chocolate cookies, soft cake-filled cones, and vibrant icing to create witch hats that look as amazing as they taste. Whether you’re baking with your kids or striving to impress your guests, these Halloween Witch Hat Cookies Recipe steps are easy to follow and promise a magical, festive result every time.

Ingredients You’ll Need
Each ingredient in this recipe plays an essential role, from creating the iconic witch hat shape to providing the perfect texture and vibrant colors. With just a handful of ingredients, you’ll be amazed at how simple and fun it is to bring these cookies to life.
- 1 box Favorite Cake Mix: This forms the soft, fluffy cake inside the hats; you can also use homemade chocolate cake for a personal twist.
- 24 Store Bought Chocolate Cookies: These sturdy bases provide the perfect crunchy platform for the hats; homemade cookies work great too.
- 12 count Sugar Cones: The key to achieving that classic witch hat shape everyone loves.
- 1 can Black Color Mist Food Coloring Spray: Gives the cones that striking black color to match our Halloween theme; black icing can be used as an alternative but is less smooth.
- 1 cup Creamy White Decorator Icing: Acts as the glue and decorating canvas, with royal icing being a firmer option for detailed piping.
- 1 bottle Lemon Yellow Icing Color: Adds bright, sunny hues perfect for decorating hat buckles and accents.
- 1 bottle Rose Icing Color: For a pop of warm color that contrasts beautifully with black hats.
- 1 bottle Violet Icing Color: Gives a mystical and magical touch for decorating.
- 1 bottle Golden Yellow Icing Color: Perfect for the hat’s signature buckle, providing a rich golden glow.
- 1 bottle Orange Icing Color: Brings a classic Halloween vibe when used as adhesive or hatband color.
How to Make Halloween Witch Hat Cookies Recipe
Step 1: Prepare the Cones
Start by baking your cake mix according to the package instructions or your favorite homemade recipe. Spoon about 2 tablespoons of batter into each sugar cone, carefully placing them upright on a baking sheet. Bake at 350°F for 15 to 18 minutes until the cakes are firm and cooked through. Once done, allow the cones to cool completely on a wire rack—they need to be cool before moving on!
Step 2: Color the Cones
Once the cones have cooled, gently trim any excess cake from the tops, ensuring a clean, even edge. This step guarantees your witch hats will look neat and professional. Now, take your black color mist food coloring spray and evenly coat each cone. This will give the signature nighttime black silhouette. Set the cones aside and let them dry thoroughly before continuing to decorate.
Step 3: Tint the Icing
Divide your creamy white decorator icing into several small bowls. Use your lemon yellow icing color to tint one bowl a bright, cheerful yellow. Another bowl can be colored with either rose or violet depending on the look you want—both give magical pops of color. Load each tinted icing into piping bags fitted with small round tips to get ready for the decorating stage.
Step 4: Assemble the Hats
Take each chocolate cookie and pipe a small dab of orange icing right in the center—this acts as a sticky base to secure your witch hat. Position one blackened sugar cone on top of each cookie gently but firmly. Next, pipe a ring of orange or purple icing around the base of the cone where it meets the cookie to hold the hat in place and add some decorative flair.
Step 5: Finish with Details
Give the assembled hats a few minutes to allow the base icing to set and hold everything steady. Once the icing has firmed up, use your yellow icing to pipe a detailed buckle around the base of each cone to mimic the classic witch hat buckle. Let your designs completely dry before serving to make sure every detail stays perfect.
How to Serve Halloween Witch Hat Cookies Recipe

Garnishes
For added flair, sprinkle edible glitter or tiny candy stars around the hats after the icing sets. A dusting of powdered sugar can mimic a spellbinding dusting of magic on the hats. Freshly colored icing details with subtle highlights in complementary colors like silver or lime green also make your Halloween Witch Hat Cookies Recipe pop visually and tastefully.
Side Dishes
Pair these witch hats with a spooky hot chocolate or a chilly pumpkin spice latte for a cozy treat. Fresh fruit skewers with autumnal flavors like apple, pear, and cinnamon-dusted bananas provide a refreshing balance. Or consider serving alongside a warm batch of caramel popcorn for a delightful mix of textures and flavors.
Creative Ways to Present
Arrange the Halloween Witch Hat Cookies Recipe on a tiered cake stand with some Halloween-themed picks and faux cobwebs for a dramatic display. Line them up on a rustic wooden board surrounded by small pumpkins and dried autumn leaves for a cozy harvest vibe. You could also present each witch hat nestled in mini cauldrons or Halloween-themed cupcake liners for a truly enchanting touch.
Make Ahead and Storage
Storing Leftovers
Once fully decorated and dried, store leftover Halloween Witch Hat Cookies in an airtight container at room temperature. When kept away from humidity and heat, these treats stay fresh and delicious for about 3 to 4 days. Layer them carefully with parchment paper to avoid smudging the icing details.
Freezing
These cookies freeze well, making them a great make-ahead treat. Place them on a baking sheet to freeze individually until firm, then transfer to a sealed, freezer-safe container. They can be frozen for up to 2 months. When ready to enjoy, thaw them at room temperature, still wrapped, to preserve their texture and decoration.
Reheating
There’s no need to reheat these Halloween Witch Hat Cookies Recipe treats since they’re best enjoyed as a cool, crisp dessert. However, if you pair them with warm drinks or want to soften the inside slightly, let them sit alongside the beverage for a few minutes to absorb some warmth naturally. Avoid microwaving, as the icing can melt.
FAQs
Can I use homemade chocolate cookies instead of store-bought ones?
Absolutely! Homemade chocolate cookies add a personal touch and you can customize the flavor and texture to your liking. Just make sure they’re sturdy enough to hold the sugar cone hats securely.
Is there a substitute for the black food coloring spray?
If you don’t have black food coloring spray, you can use black icing to cover the sugar cones, though spraying tends to give a smoother, more even finish. Another idea is to use black fondant if you want a polished look, but spraying is the quickest way.
Can I prepare the icing colors ahead of time?
Yes, you can tint the decorator icing a day ahead. Store each color tightly covered with plastic wrap touching the surface to prevent drying. Just mix well before piping to keep the colors vibrant and smooth.
What if my sugar cones break while baking?
Sugar cones can be delicate, so bake carefully and avoid overfilling them with batter. If a cone cracks, you can patch it with icing after baking, or simply use it as a fun break-apart garnish on top of the cookie.
How long will the decorations last on the cookies?
Decorated properly and stored in an airtight container, your Halloween Witch Hat Cookies Recipe should retain their charm and taste for about 3 to 4 days. The icing can harden nicely, keeping your decoration intact if handled carefully.
Final Thoughts
There is nothing quite as magical as biting into a wonderfully decorated Halloween Witch Hat Cookie that you made with your own hands. This Halloween Witch Hat Cookies Recipe brings together festive fun, easy baking, and colorful creativity in a way that’s sure to become a new seasonal favorite in your household. So grab your ingredients, put on some spooky tunes, and get ready to create a delicious Halloween memory you and your loved ones will cherish!
Print
Halloween Witch Hat Cookies Recipe
- Prep Time: 15 minutes
- Cook Time: 18 minutes
- Total Time: 48 minutes
- Yield: 12 witch hat cookies
- Category: Dessert
- Method: Baking
- Cuisine: American
Description
Create enchanting Halloween Witch Hat Cookies that are as fun to make as they are to eat. These festive treats combine moist sugar cone mini cakes with chocolate cookies, decorated with colorful icing and a sleek black finish for the perfect spooky celebration dessert your kids will adore.
Ingredients
Cake Cones
- 1 box Favorite Cake Mix (chocolate or your choice)
- 12 count Sugar Cones
- 1 can Black Color Mist Food Coloring Spray
Cookies
- 24 Store Bought Chocolate Cookies (or homemade)
Icing and Decorations
- 1 cup Creamy White Decorator Icing (royal icing can be used for firmer finish)
- 1 bottle Lemon Yellow Icing Color
- 1 bottle Rose Icing Color
- 1 bottle Violet Icing Color
- 1 bottle Golden Yellow Icing Color
- 1 bottle Orange Icing Color
Instructions
- Prepare the cones: Mix and bake the cake batter inside each sugar cone by filling with about 2 tablespoons. Place cones upright on a baking sheet and bake at 350°F (175°C) for 15-18 minutes until cooked through. Let cool completely before handling.
- Color the cones: Trim any excess cake from the cone tops for a clean edge. Spray each cone with black color mist food coloring evenly and allow to dry fully to achieve the signature witch hat look.
- Tint the icing: Divide the creamy white decorator icing into separate bowls. Color one bowl lemon yellow, another rose or violet, and leave some plain if desired. Prepare piping bags with each color for decorating.
- Assemble the hats: Pipe a small dab of orange icing onto the center of each chocolate cookie to act as glue. Position one black-coated sugar cone upright on each cookie, then pipe orange or purple icing around the base to secure the cone in place.
- Finish with details: Allow the initial icing to set for a few minutes. Once stable, pipe a yellow buckle detail around the base band of each cone for a final festive touch. Let dry completely before serving.
Notes
- Use homemade chocolate cookies and cake mix for a personalized homemade touch.
- If black color mist spray is unavailable, carefully use black icing for coating the cones, though spray gives a smoother finish.
- Royal icing can be substituted for decorator icing if a firmer texture is preferred.
- Allow cones and icing to dry thoroughly between steps to avoid smudging.
- Store cookies in an airtight container at room temperature for up to 3 days to maintain freshness.


