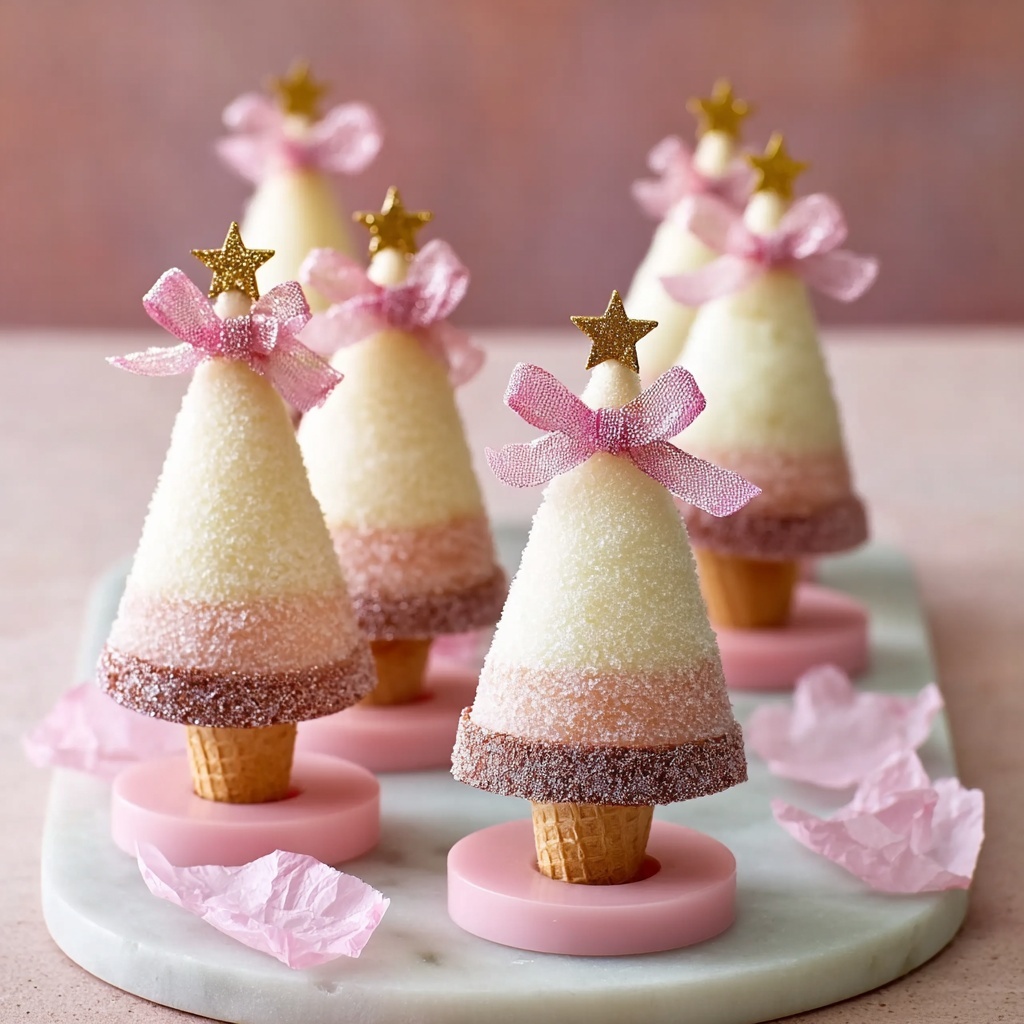
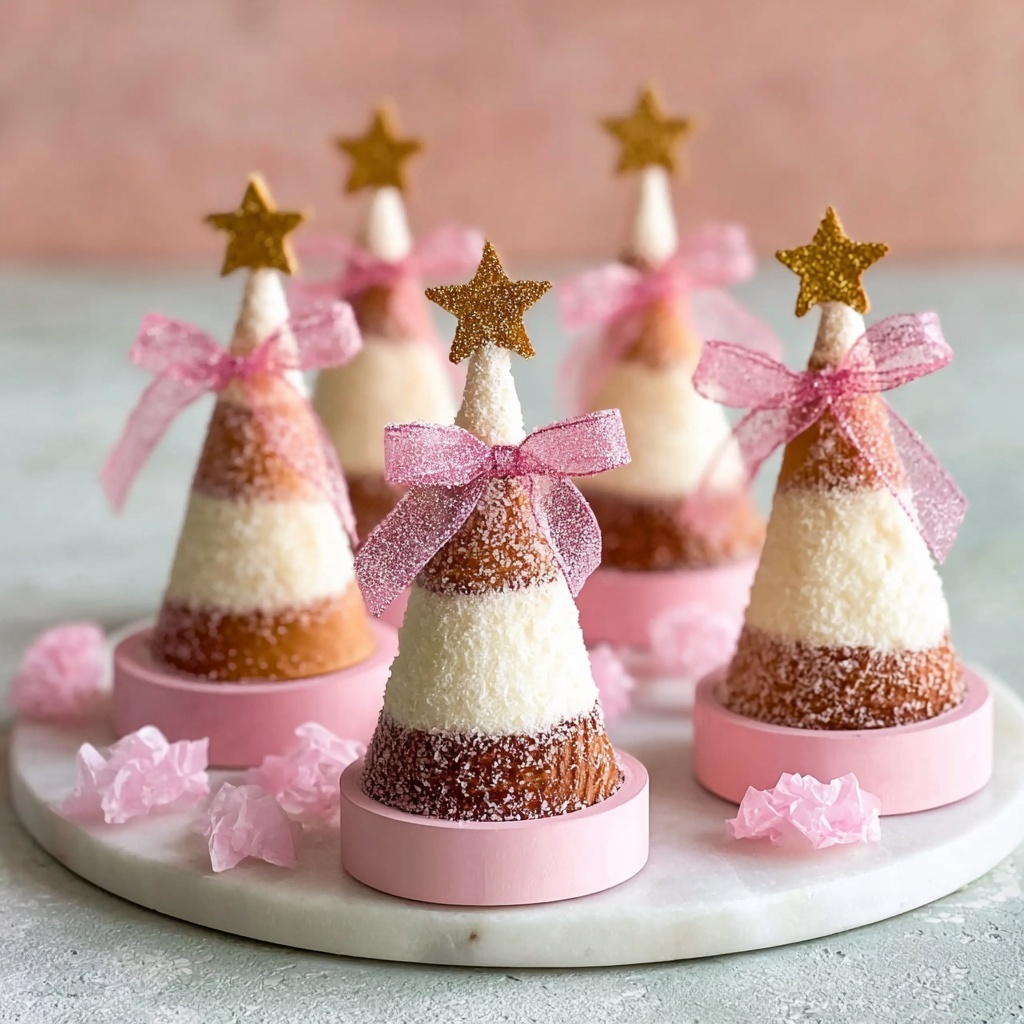
Nothing says festive cheer quite like crafting your own holiday treats, and this Coconut Ice Christmas Trees Recipe brings a delightful twist to classic coconut ice. These charming, colorful trees are not only adorable but also melt-in-your-mouth irresistible, making them a perfect seasonal treat to share with family and friends. From the creamy, sweet coconut layers to the sparkle of edible decorations, this recipe adds an extra sparkle to any holiday table.
Ingredients You’ll Need
Gathering these simple but essential ingredients is the first step toward making your Coconut Ice Christmas Trees Recipe a memorable success. Each item plays a vital role, whether in building texture, adding sweetness, or lending that festive color to your mini trees.
- 500 grams Pure icing sugar: Choose pure or powdered sugar for the perfect sweet base with smooth texture.
- 1 teaspoon Cream of tartar: Helps keep the coconut ice light and prevents crystallization; optional if you don’t have any.
- 395 grams Sweetened condensed milk: Adds incredible creaminess and sweetness to hold the coconut mixture together.
- 200 grams Desiccated coconut: Provides that delightful chewy texture essential for coconut ice; shredded coconut works for a different mouthfeel.
- 1 teaspoon Vanilla essence: Infuses the mixture with warm, inviting flavor; almond extract is a lovely alternative if you want a twist.
- A few drops Pink food coloring: Optional, but great for creating those iconic pink and white layers in your coconut ice Christmas trees.
- 12 pieces Large waffle ice-cream cones: Form the base of your coconut trees; regular cones can be substituted if needed.
- 200 grams White chocolate melts: Perfect for piping “tinsel” onto your coconut trees; milk chocolate can be used for a sweeter finish.
- Gold and white cachous, edible gold stars: Adds dazzling sparkle and festive charm with edible glitter and sprinkles.
How to Make Coconut Ice Christmas Trees Recipe
Step 1: Prepare the Coconut Ice Mixture
Begin by sifting the pure icing sugar and cream of tartar into a large bowl. This step is crucial for ensuring your coconut ice mixture is wonderfully smooth and free of lumps. Then stir in the sweetened condensed milk, desiccated coconut, and vanilla essence until every bit is perfectly combined, creating that rich and inviting base for your trees.
Step 2: Add Color and Texture
Divide your mixture evenly into two bowls. Add a few drops of pink food coloring to one half and mix until the color is fully absorbed. Instead of layering or swirling, crumble the pink mixture gently over the white, then press lightly together. This method gives your coconut ice that charming marbled, snowy texture resembling real Christmas trees.
Step 3: Shape the Trees with Waffle Cones
Now the fun part: carefully fill each large waffle ice-cream cone with the coconut mixture, pressing gently to pack it in without breaking the cones. Once filled, place the cones upright in the fridge and chill for about 30 minutes to set firmly.
Step 4: Chill and Decorate
After the initial set, gently remove the cones from the coconut ice molds and chill the shaped trees for another half hour to fully firm up. Meanwhile, melt the white chocolate melts according to package instructions. Using a piping bag or a small spoon, drizzle or pipe the chocolate onto your coconut trees to create whimsical tinsel swirls. Quickly decorate with cachous and edible stars to make them sparkle with festive glamour.
How to Serve Coconut Ice Christmas Trees Recipe

Garnishes
Enhance the visual and flavorful appeal of your Coconut Ice Christmas Trees Recipe by adding a dusting of icing sugar for a snowy look or more edible glitter for sparkle. Fresh mint leaves contrast beautifully against the white and pink, adding a fresh hint of green that complements the festive feel.
Side Dishes
These sweet coconut trees pair wonderfully with a warm cup of hot chocolate sprinkled with cinnamon or a mild chai tea. If you’re serving at a holiday party, consider arranging them on a platter alongside gingerbread cookies or mini fruit tarts for a delightful dessert spread that excites every palate.
Creative Ways to Present
Present your Coconut Ice Christmas Trees Recipe in clear glass jars or on festive cake stands surrounded by fairy lights to catch all the sparkling decorations. They also make fantastic edible gifts — just wrap them in cellophane bags tied with bright ribbons for guests to take home a little holiday magic.
Make Ahead and Storage
Storing Leftovers
Keep your coconut ice trees fresh by storing them in an airtight container in the refrigerator. They’ll stay deliciously soft and tasty for up to one week, allowing you to make them well in advance without losing any quality.
Freezing
You can freeze Coconut Ice Christmas Trees Recipe treats if you want to prepare early. Wrap each tree carefully in plastic wrap and store them in a freezer-safe container. When ready to enjoy, thaw them in the refrigerator overnight for the best texture and flavor retention.
Reheating
This recipe is best enjoyed chilled, so reheating isn’t recommended. However, if the white chocolate decorations harden too much after refrigeration, simply let the trees sit at room temperature for 10-15 minutes to soften slightly before serving.
FAQs
Can I use shredded coconut instead of desiccated coconut?
Absolutely! Shredded coconut will give your Coconut Ice Christmas Trees Recipe a more fibrous texture and a slightly different chew. It’s a great variation if you prefer a more rustic look and feel.
What if I don’t have cream of tartar?
Cream of tartar helps prevent crystallization and keeps your coconut ice smooth, but it’s optional. If you don’t have it on hand, simply omit it and proceed—the recipe will still turn out delicious and festive.
Can I make these trees in advance?
Yes! The Coconut Ice Christmas Trees Recipe is fantastic for making ahead. They store well in the fridge and can even be frozen, so planning your holiday desserts becomes stress-free and fun.
What can I substitute for sweetened condensed milk?
Sweetened condensed milk is key for sweetness and texture here, but if you need a substitute for dietary reasons, try a dairy-free condensed milk alternative or use coconut condensed milk to keep the coconut flavor prominent.
Are there other colors besides pink I can use?
Definitely! Feel free to experiment with food coloring—green, red, or even blue can create whimsical effects. Just keep the colors light to maintain the soft look of traditional coconut ice Christmas trees.
Final Thoughts
There’s nothing quite like sharing the joy of handmade holiday treats, and the Coconut Ice Christmas Trees Recipe is a shining star in any festive kitchen. With its easy ingredients, simple steps, and magical presentation, it’s truly a recipe worth adding to your seasonal traditions. So grab your cones and coconut, and get ready to create some sweet, sparkling memories!
Print
Coconut Ice Christmas Trees Recipe
- Prep Time: 20 minutes
- Cook Time: 0 minutes
- Total Time: 1 hour 15 minutes
- Yield: 12 servings
- Category: Dessert
- Method: No-Cook
- Cuisine: Western
- Diet: Vegetarian
Description
Create festive Coconut Ice Christmas Trees, a sweet and fun holiday treat made by combining creamy coconut ice with colorful layers, shaped inside waffle cones, and decorated with melted white chocolate and edible stars to resemble Christmas trees. Perfect for family gatherings and holiday celebrations.
Ingredients
Coconut Ice Mixture
- 500 grams Pure icing sugar (Can substitute with powdered sugar if needed)
- 1 teaspoon Cream of tartar (Can be omitted if unavailable)
- 395 grams Sweetened condensed milk (Use regular or low-fat based on preference)
- 200 grams Desiccated coconut (Shredded coconut can be used for a different texture)
- 1 teaspoon Vanilla essence (Substitute with almond extract for a slightly different taste)
- a few drops Pink food coloring (Optional and can be swapped for other colors)
Assembly and Decoration
- 12 pieces Large waffle ice-cream cones (Regular cones can work in a pinch)
- 200 grams White chocolate melts (Milk chocolate can be a sweeter alternative)
- Gold and white cachous, edible gold stars (Other edible glitter or sprinkles can also be used, quantity as needed)
Instructions
- Prepare the dry ingredients: In a large bowl, sift together the pure icing sugar and cream of tartar to ensure a smooth blend without lumps, creating a fine base for the coconut ice mixture.
- Combine with wet ingredients: Stir in the sweetened condensed milk, desiccated coconut, and vanilla essence thoroughly until the mixture comes together evenly and thickly.
- Color the mixture: Divide the mixture evenly in half. Tint one half with a few drops of pink food coloring until the desired shade is reached. Crumble the pink-tinted mixture over the white portion and gently combine to create a marbled effect without fully blending the colors.
- Fill the cones: Carefully spoon and pack the coconut ice mixture into each large waffle ice-cream cone, ensuring they are fully filled and shaped like Christmas trees.
- Chill to set: Place the filled cones in the refrigerator for about 30 minutes to allow the coconut ice to firm up properly.
- Further chilling: After initial setting, remove the cones from the mixture if needed and chill again for another 30 minutes to ensure the treats are well set and cold for decorating.
- Decorate the trees: Melt the white chocolate melts gently, then pipe the melted chocolate onto the set coconut ice trees to resemble tinsel. Decorate with gold and white cachous, edible gold stars, or other edible decorations to enhance the festive appearance.
Notes
- Cream of tartar can be omitted if you do not have it; it helps with texture but is not essential.
- You can substitute pure icing sugar with powdered sugar if necessary.
- Try almond extract instead of vanilla essence for a slightly different flavor profile.
- Use shredded coconut for a chewier texture instead of desiccated coconut.
- Regular waffle cones can be used if large ice-cream cones are unavailable.
- Milk chocolate can replace white chocolate melts for a sweeter decoration alternative.
- Refrigeration time may vary slightly depending on your fridge; ensure the mixture is firmly set before decorating.


