Classic Popovers Recipe
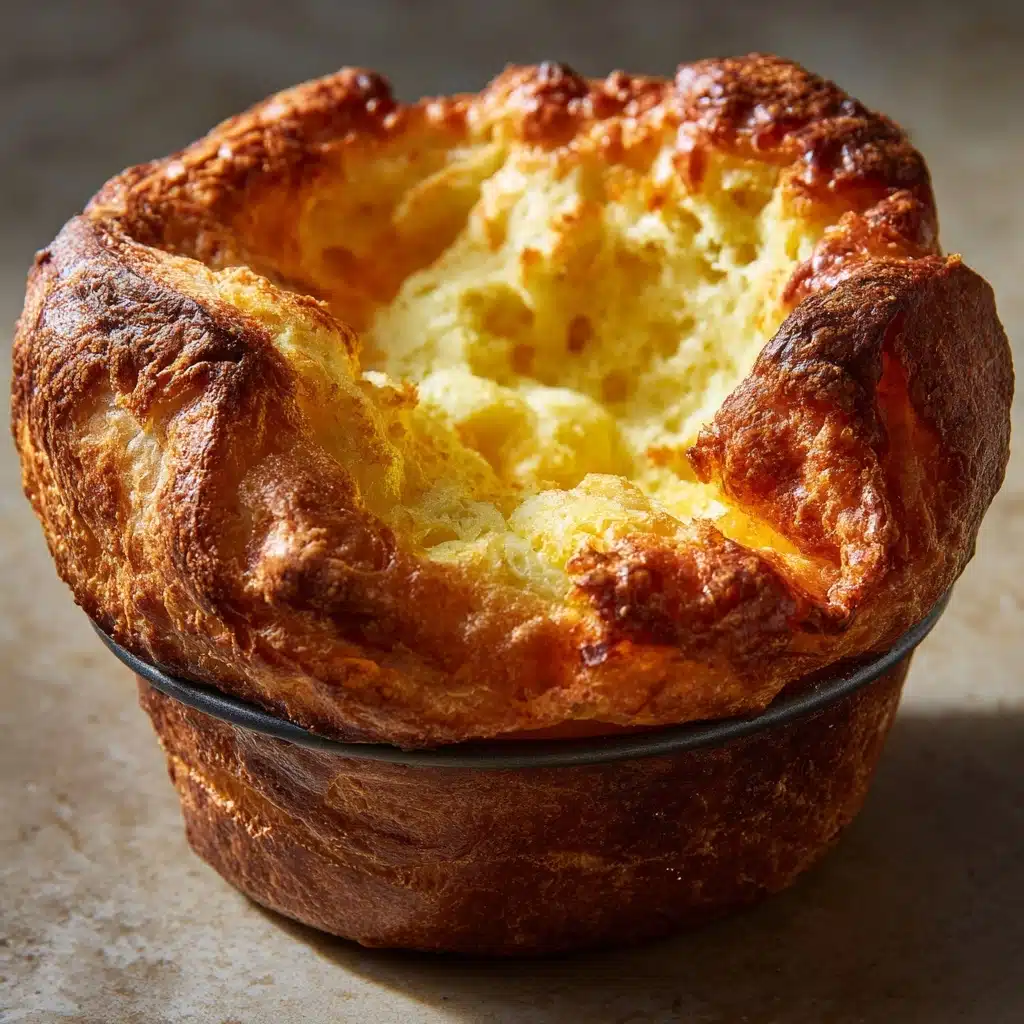
If you’re looking for a show-stopping breakfast or brunch treat that’s surprisingly simple, Classic Popovers are the answer! These golden, sky-high wonders are light, airy, and crisp on the outside, with a pillowy, eggy interior that you won’t soon forget. They brim with buttery flavor and a little touch of magic as they puff to incredible heights in the oven. Whether you’re serving them alongside soups or letting them take center stage with butter and jam, Classic Popovers are the ultimate way to bring a bit of bakery flair into your own kitchen.

Ingredients You’ll Need
The magic of Classic Popovers is all about simplicity! Each ingredient plays a crucial role in giving these beauties their signature texture and irresistible flavor. Here’s everything you need, along with why it matters.
- All-purpose flour: The backbone of the popover batter, giving structure while keeping things light and airy.
- Whole milk (at room temperature): Adds richness and moisture, helping the popovers rise and develop their signature custardy interior.
- Large eggs (at room temperature): Eggs do the heavy lifting—both binding the batter and creating steam for that glorious puff.
- Salt: Just half a teaspoon wakes up all the other flavors and keeps the popovers from tasting flat.
- Unsalted butter (melted): Adds delicious flavor and a tender crumb. A little goes a long way here!
- Additional butter or oil (for greasing): Helps ensure your popovers release easily and get perfectly crisp on the outside.
How to Make Classic Popovers
Step 1: Preheat and Prep Your Pan
Start by setting your oven to 450°F. Pop your popover pan—or a regular muffin tin—into the oven right away. Preheating the pan makes all the difference, giving Classic Popovers that dramatic rise and crispy shell that makes them so irresistible.
Step 2: Whisk the Dry Ingredients
Grab a medium bowl and whisk together the all-purpose flour and salt. Mixing the dry goods together evenly ensures that every bite of your popover is perfectly seasoned and has the ideal texture.
Step 3: Combine the Wet Ingredients
In a separate bowl, whisk your eggs and room temperature milk until smooth and fully blended. This is key—room temperature ingredients help the batter combine more easily and rise higher in the oven!
Step 4: Make the Batter
Slowly pour the egg and milk mixture into your flour mixture, whisking constantly. Aim for a smooth, lump-free batter. Finish by stirring in your melted butter. The resulting batter will be quite thin, and that’s exactly what you want for the best Classic Popovers.
Step 5: Prep the Hot Pan
Carefully remove the sizzling hot pan from your oven (use those oven mitts!). Quickly grease each well with a little butter or oil. This not only prevents sticking but also helps the popovers develop crisp, golden sides.
Step 6: Fill and Bake
Pour the batter evenly into the greased cups, filling each about halfway. Pop the pan back into the oven and resist the urge to peek! Bake at 450°F for 15 minutes, then reduce the oven temperature to 350°F and bake for another 15–20 minutes. You’ll know they’re done when the Classic Popovers are towering, golden brown, and sound hollow when tapped.
Step 7: Release Steam and Serve
Once out of the oven, quickly pierce each popover with a sharp knife to let the steam escape—this keeps them crisp rather than soggy. Serve while they’re hot and fresh for maximum wow-factor.
How to Serve Classic Popovers
Garnishes
A sprinkle of flaky salt, a brush of melted butter, or a dusting of powdered sugar can transform Classic Popovers into something truly special. For a sweet start to your day, try a swipe of jam or honey. If you’re feeling savory, chive butter or a drizzle of herbed olive oil is divine.
Side Dishes
Classic Popovers pair beautifully with a wide array of main dishes. Enjoy them alongside hearty soups and stews to soak up every last drop, or pile them on your brunch table next to crispy bacon, fluffy scrambled eggs, or smoked salmon. No matter the meal, they’re a surefire hit.
Creative Ways to Present
Want your Classic Popovers to be the star of the show? Try serving them in a basket lined with a bright napkin, or use them as creative vessels for scrambled eggs, whipped cream, or even a scoop of ice cream for a dessert twist. Arrange them in a tower for a centerpiece your guests won’t soon forget!
Make Ahead and Storage
Storing Leftovers
If you have a few Classic Popovers left after breakfast (lucky you!), let them cool completely, then store them in an airtight container at room temperature. They’re best enjoyed within a day or two, as their texture is most magical fresh from the oven.
Freezing
Classic Popovers freeze remarkably well! Once cooled, tuck them into a freezer bag or airtight container. They’ll keep for up to two months. When you’re ready to relive the magic, there’s a simple reheating trick to make them just as delicious as day one.
Reheating
To bring your Classic Popovers back to life, preheat your oven to 350°F, set the popovers directly on the rack, and bake for 5 to 8 minutes, or until warmed through. They’ll emerge beautifully crisp and ready to impress all over again.
FAQs
Why do my Classic Popovers sometimes deflate?
Popovers deflate if the oven is opened too early or if they’re removed before they’re fully baked. Make sure to resist the urge to open the oven door during baking, and pierce them right after baking to release steam for the best results.
Can I use low-fat milk instead of whole milk?
Whole milk gives Classic Popovers the richest flavor and tenderness, but 2% milk will also work in a pinch. Non-dairy milk can be used, but may slightly alter the texture and taste.
What’s the difference between a popover pan and a muffin tin?
Popover pans are deeper and have straight sides, giving Classic Popovers a taller, more impressive rise. However, a muffin tin works just fine—your popovers will still be deliciously puffy and golden!
Can I add herbs, cheese, or other mix-ins to the batter?
Absolutely! Folding in chopped fresh herbs, a sprinkle of grated cheese, or even a pinch of black pepper adds a flavorful twist to Classic Popovers. Just be careful not to overload the batter, as too much add-in can weigh them down.
How can I make my Classic Popovers even crispier?
Preheating both the pan and the oven is key for extra-crisp exteriors. Also, make sure to poke each popover right after baking to let steam out—this helps preserve that glorious crust.
Final Thoughts
If you’re ready to bring a little baking magic to your table, Classic Popovers are just the ticket. They’re easy enough for a weeknight, impressive enough for a celebration, and guaranteed to make everyone at the table smile. Pull out your pan and give them a try—the first bite is truly unforgettable!
Print
Classic Popovers Recipe
- Total Time: 45 minutes
- Yield: 6 popovers 1x
- Diet: Vegetarian
Description
Learn how to make classic popovers with this easy homemade recipe. These airy and eggy bread rolls are perfect for any meal, whether served with butter or as a side to soups and stews.
Ingredients
Dry Ingredients:
- 1 cup all-purpose flour
- ½ teaspoon salt
Wet Ingredients:
- 1 cup whole milk (at room temperature)
- 2 large eggs (at room temperature)
- 1 tablespoon unsalted butter (melted)
- Additional butter or oil for greasing the pan
Instructions
- Preheat the Oven: Preheat the oven to 450°F and place a popover pan or muffin tin in the oven to heat.
- Mix Dry Ingredients: In a medium bowl, whisk together the flour and salt.
- Combine Wet Ingredients: In a separate bowl, whisk eggs and milk until well combined. Gradually add wet ingredients to the flour mixture, whisking until smooth. Stir in melted butter.
- Prepare Pan: Grease each cup of the hot pan with butter or oil. Pour batter into cups, filling halfway.
- Bake: Bake at 450°F for 15 minutes, then reduce temperature to 350°F and bake for another 15–20 minutes until golden brown and puffed.
- Release Steam: Pierce each popover with a knife to release steam. Serve warm.
Notes
- For best results, use room temperature ingredients and preheat the pan.
- Enjoy popovers with butter, jam, or as a side to soups and stews.
- Prep Time: 10 minutes
- Cook Time: 35 minutes
- Category: Bread
- Method: Baking
- Cuisine: American
Nutrition
- Serving Size: 1 popover
- Calories: 140
- Sugar: 1g
- Sodium: 180mg
- Fat: 6g
- Saturated Fat: 3g
- Unsaturated Fat: 2g
- Trans Fat: 0g
- Carbohydrates: 15g
- Fiber: 0g
- Protein: 5g
- Cholesterol: 85mg


