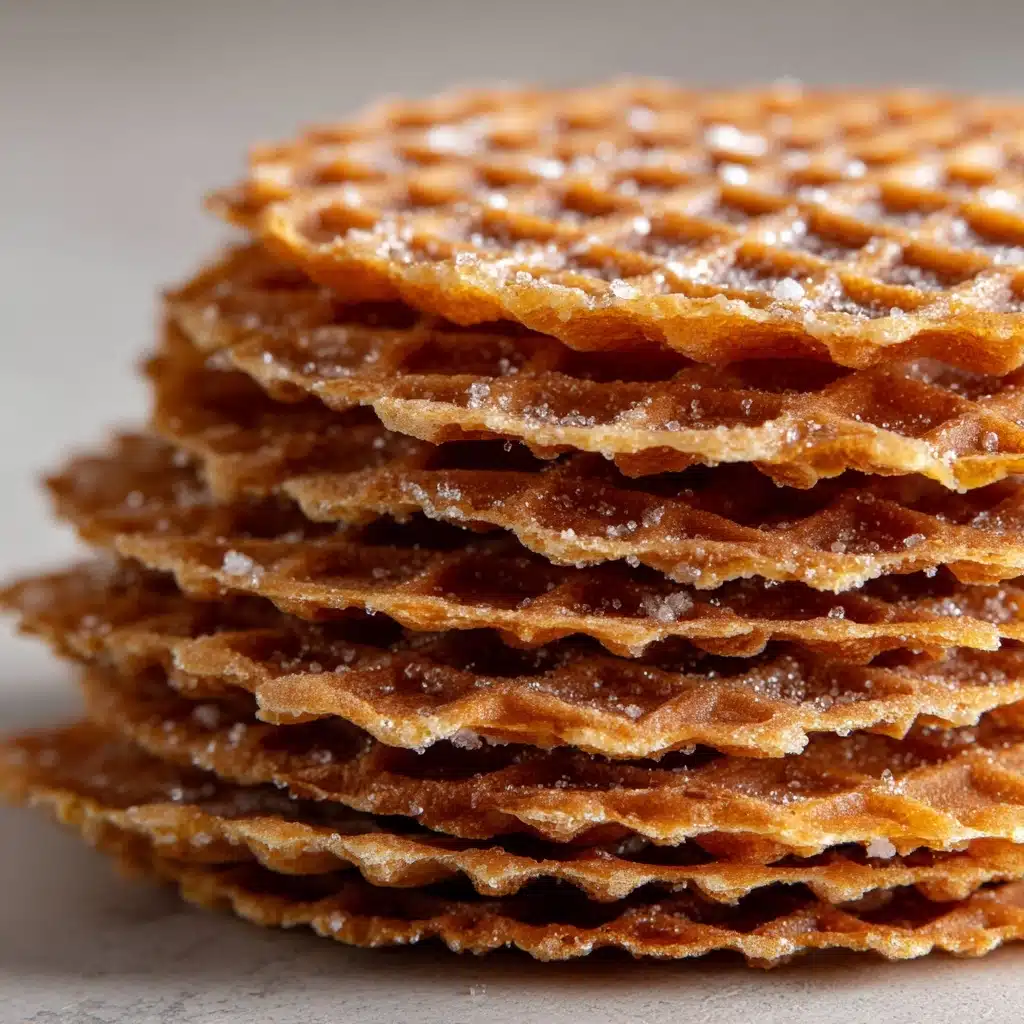
Classic Pizzelle Recipe
If you’re looking for a crisp, lacy cookie with deep Italian roots and irresistible old-world charm, Classic Pizzelle is about to become your go-to treat. Delicate yet sturdy, with a traditional floral imprint that hints at special holidays and cozy gatherings, these cookies deliver a beautiful blend of vanilla and buttery notes—plus a whisper of anise, if desired. Whether you’re making them for a festive dessert table or simply to enjoy with your afternoon coffee, Classic Pizzelle bring a taste of tradition into your kitchen in the most joyful, delicious way.
Ingredients You’ll Need
Ingredients You’ll Need
The beauty of Classic Pizzelle lies in its simplicity—just a handful of familiar ingredients, each one playing a crucial role. From the softness of the eggs to that signature hint of vanilla (and possibly anise), these building blocks create the signature crisp, golden pizzelle everyone loves.
- Eggs: The foundation for a light, tender cookie; make sure they’re at room temperature for the best texture.
- Granulated Sugar: Sweetens the cookies while helping achieve that lovely pale golden hue.
- Unsalted Butter (melted and cooled): Brings richness and keeps the pizzelle wonderfully crisp and flavorful.
- Vanilla Extract: Classic vanilla is essential for depth and warmth in every bite.
- Anise Extract (optional): For a traditional Italian twist, anise offers a subtle hint of licorice that’s truly nostalgic.
- All-Purpose Flour: The perfect everyday staple to bind and provide structure.
- Baking Powder: Just a touch helps the cookies puff ever so slightly, keeping them crisp yet light.
How to Make Classic Pizzelle
Step 1: Prepare Your Batter
Start by grabbing your largest mixing bowl and beat the eggs and sugar together. This is the magic moment where air gets whipped in, creating a pale, lightly thickened base—aim for 2 to 3 minutes of gentle mixing. When they look creamy and slightly frothy, blend in the melted (and cooled!) butter, vanilla, and anise extracts. Separately, whisk together the flour and baking powder, then add this dry mix gradually to the wet ingredients until you have a smooth, cohesive batter. Don’t overmix—just a few turns will do!
Step 2: Preheat the Pizzelle Iron
Plug in your pizzelle iron and let it heat up according to the manufacturer’s directions. A hot iron is key for creating pizzelle with those gorgeous patterns and crisp edges. If you’re new to pizzelle making, use a tiny dab of melted butter or nonstick spray on the iron to guarantee easy release (though most modern irons need very little, if any).
Step 3: Cooking Classic Pizzelle
Using a tablespoon, scoop a generous dollop of batter right into the center of each mold. Don’t worry if it doesn’t look like much—once you press the lid down, the batter will spread beautifully, filling the ornate design. Let each batch cook for 30 to 45 seconds, peeking after the first 30 seconds for a light golden color. When the edges look crisp and the scent is toasty and sweet, use a fork or spatula to lift each pizzelle off the hot plates. Work quickly; they’re more flexible while warm!
Step 4: Cool and Shape
Transfer hot pizzelle directly to a cooling rack to cool flat and crisp up perfectly. If you’re feeling creative, now is the time to gently shape them into cones or cups (for filling with cream, berries, or gelato!)—just drape the warm cookies over a rolling pin or small bowl and let them cool in place. Once set, they’re sturdy yet miraculously delicate.
How to Serve Classic Pizzelle
Garnishes
Elevate your Classic Pizzelle with a dusting of powdered sugar, a drizzle of melted chocolate, or even a sprinkle of toasted nuts. For festive occasions, a dusting of cinnamon sugar or a dip in colored sprinkles adds an extra flourish and hint of fun. If you shaped them into cones or bowls, fill them up with whipped cream or a scoop of your favorite ice cream for a showstopping presentation.
Side Dishes
Classic Pizzelle pairs beautifully with a cup of strong espresso or cappuccino, making them perfect for an afternoon treat. Serve them alongside fresh fruit, or as part of a larger Italian cookie platter featuring biscotti and amaretti for a truly celebratory spread. For a holiday feast, a plate of pizzelle is inevitably the first to disappear.
Creative Ways to Present
Think beyond the classic stack! Layer pizzelle in a tall glass jar for a striking edible centerpiece, or tie a few together with ribbon for a lovely homemade gift. Make mini ice cream sandwiches with two pizzelle and a layer of gelato, or set up a “decorate your own pizzelle” bar with assorted toppings and dips for a family-friendly dessert activity. The versatility of Classic Pizzelle means they’re as delightful on a casual weeknight as they are on a decorated holiday table.
Make Ahead and Storage
Storing Leftovers
Classic Pizzelle keep beautifully at room temperature for up to a week. Once completely cooled, stack them gently in an airtight container, separating layers with a sheet of wax or parchment paper. This helps preserve their signature crispness and keeps them from absorbing moisture.
Freezing
If you want to enjoy Classic Pizzelle a bit longer, freezing is a breeze. Place completely cooled pizzelle in a freezer-safe bag with wax paper between each cookie to prevent sticking. They’ll keep well for up to 2 months. To serve, just let them thaw uncovered at room temperature for about 15 minutes.
Reheating
If your pizzelle lose their crunch, you can revive them with a quick oven refresh. Lay them in a single layer on a baking sheet and warm at 300°F (150°C) for 2 to 4 minutes. Be sure to watch closely—just a brief stint brings them back to life, crispy as the day you made them!
FAQs
Do I need a special pizzelle iron to make Classic Pizzelle?
Yes, a pizzelle iron is essential for achieving the cookie’s traditional thin, patterned look and texture. Electric pizzelle irons are widely available, and they make the process easy for home bakers.
Can I make Classic Pizzelle without anise?
Absolutely! The classic vanilla version is wonderfully flavorful on its own. If you’re iffy about licorice notes, just skip the anise extract—your pizzelle will still be deliciously authentic.
Why are my pizzelle soft instead of crisp?
Soft pizzelle usually mean they haven’t been cooled properly or were stored before drying completely. Cool each cookie fully on a wire rack before stacking, and store them in an airtight container with parchment between layers to maintain their crispness.
How do I shape pizzelle into cones or bowls?
Right after removing the pizzelle from the iron, gently drape the warm cookie over a cone mold, rolling pin, or small bowl. Work quickly—they firm up fast! Once cooled, they’ll hold their shape perfectly for creative treats.
Can Classic Pizzelle be made gluten-free?
Yes! Substitute a high-quality 1:1 gluten-free flour blend for the all-purpose flour. You may need a touch less or more flour depending on the brand, so monitor your batter’s thickness and adjust as needed.
Final Thoughts
Classic Pizzelle are a joyful celebration of tradition, flavor, and creativity. Once you taste that first crisp, delicate cookie, you’ll see why they have been cherished for generations. Gather your friends, family, or simply treat yourself, and let the warm aroma of homemade pizzelle fill your kitchen. You’re just a batch away from a new family favorite!
Print
Classic Pizzelle Recipe
- Total Time: 35 minutes
- Yield: 24 pizzelle
- Diet: Vegetarian
Description
Learn how to make classic pizzelle, traditional Italian waffle cookies that are light, crispy, and delicately flavored with vanilla and anise.
Ingredients
Eggs:
3 large eggs
Granulated Sugar:
¾ cup
Unsalted Butter:
½ cup, melted and cooled
Vanilla Extract:
1 teaspoon
Anise Extract (optional):
1 teaspoon
All-Purpose Flour:
1¾ cups
Baking Powder:
2 teaspoons
Instructions
- Beat Eggs and Sugar: In a large bowl, beat the eggs and sugar until light and slightly thickened, about 2–3 minutes.
- Add Wet Ingredients: Stir in the melted butter, vanilla extract, and anise extract if using.
- Combine Dry Ingredients: In a separate bowl, whisk together the flour and baking powder.
- Mix Batter: Gradually add the dry ingredients to the wet mixture, stirring until just combined.
- Cook Pizzelle: Preheat a pizzelle iron, drop batter onto molds, cook for 30–45 seconds until golden.
- Cool and Shape: Remove pizzelle, cool on a rack, and shape while warm if desired. Repeat with remaining batter.
Notes
- Pizzelle can be shaped into cones or cups while warm for serving with ice cream.
- Store in an airtight container at room temperature for up to 1 week.
- For a crisper texture, let them cool completely on a wire rack.
- Prep Time: 10 minutes
- Cook Time: 25 minutes
- Category: Dessert
- Method: Griddle/Iron
- Cuisine: Italian
Nutrition
- Serving Size: 1 pizzelle
- Calories: 85
- Sugar: 6g
- Sodium: 20mg
- Fat: 4g
- Saturated Fat: 2g
- Unsaturated Fat: 2g
- Trans Fat: 0g
- Carbohydrates: 11g
- Fiber: 0g
- Protein: 1g
- Cholesterol: 25mg

