Classic Cherry Delight Recipe
If you’re craving a dessert that’s cool, creamy, and bursting with nostalgic charm, look no further than Classic Cherry Delight. This utterly irresistible treat layers a buttery graham cracker crust, fluffy cream cheese filling, and a crown of glossy cherry pie filling—it’s pure comfort in every bite! Whether you’re whipping it up for a potluck or just to treat yourself, Classic Cherry Delight never fails to delight friends and family with its sweet tang and dreamy texture.
Ingredients You’ll Need
Part of what makes Classic Cherry Delight such a joy is how beautifully basic the ingredient list is. Each component serves a purpose, from the crunch of the graham cracker crust to the luscious cherry topping—no tricky techniques, just pure simple bliss.
- Graham Cracker Crumbs: A classic, slightly nutty base that holds everything together and brings a comforting crunch.
- Granulated Sugar: Adds a touch of extra sweetness to balance the crust and enhance flavor throughout.
- Unsalted Butter, Melted: Helps bind the crumbs and adds a buttery richness you can’t skip.
- Cream Cheese, Softened: The creamy backbone of the filling; be sure it’s softened for the smoothest texture.
- Powdered Sugar: Blends seamlessly into the filling, giving it a sweet, velvety finish with no grittiness.
- Vanilla Extract: Just a splash lifts the other flavors and adds the signature warmth every great dessert needs.
- Whipped Topping: Folds into the cream cheese for airy lightness—making this dessert delightfully fluffy.
- Cherry Pie Filling: The shining star! Juicy, ruby-red cherries add color, tang, and that irresistible signature flavor.
How to Make Classic Cherry Delight
Step 1: Mix and Prepare the Crust
First, grab a medium bowl and mix together the graham cracker crumbs, granulated sugar, and melted butter. Think of these three as your sturdy foundation! Stir until every crumb glistens with butter, ensuring the crust will hold together. Firmly press this mixture into the bottom of a 9×9-inch baking dish. Pop the dish into the fridge while you work on the next layer, so the crust can firm up nicely.
Step 2: Whip Up the Cream Cheese Filling
Now, let’s make that irresistibly creamy middle. In a separate bowl, use a hand mixer to beat the softened cream cheese until it’s smooth and lump-free—patience pays off for the best texture! Add in the powdered sugar and vanilla extract, then beat again until you have a creamy, dreamy mixture. Gently fold in the whipped topping, being careful not to deflate its airy volume. The result is a luscious, fluffy filling you’ll want to sneak a taste of right away.
Step 3: Layer and Spread the Goodness
Retrieve your crust from the fridge and gently spread the cream cheese mixture over it, smoothing the top as evenly as possible. An offset spatula or the back of a large spoon works wonders here. This forms a pillowy layer that will pair perfectly with the tart cherries to come.
Step 4: Add that Cherry Finishing Touch
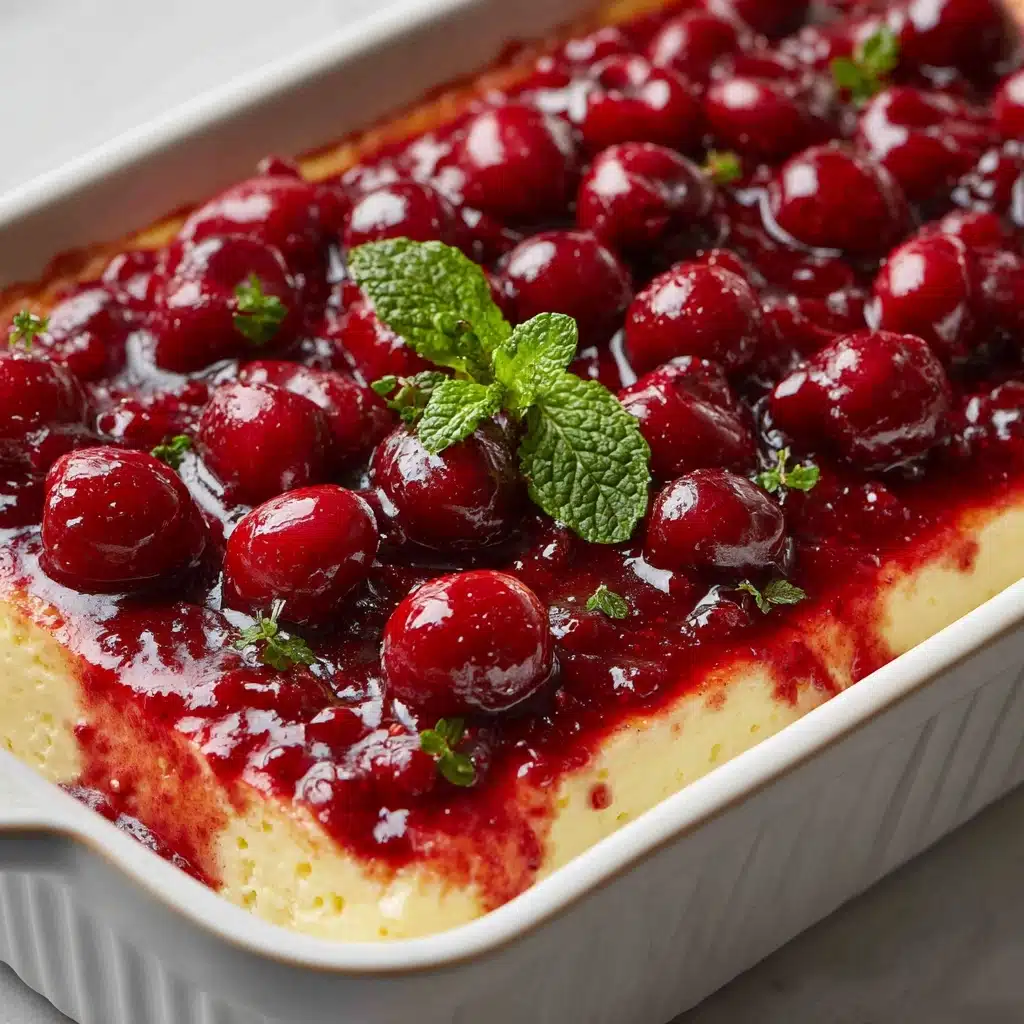
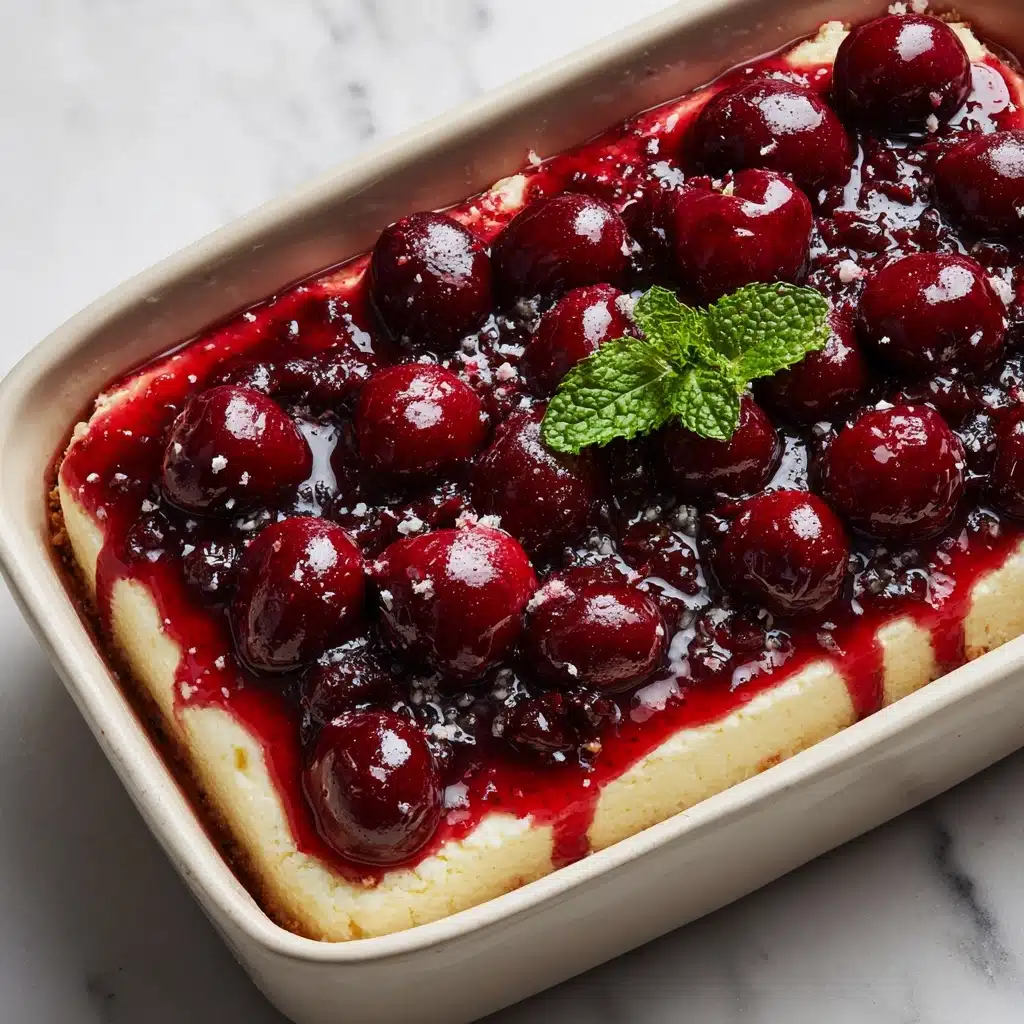
Now for the crowning moment! Evenly spoon the cherry pie filling over the cream cheese layer. Spread it out with care so every bite gets a burst of cherry. The color contrast here is gorgeous—no wonder Classic Cherry Delight always grabs attention at the table.
Step 5: Chill and Serve Your Classic Cherry Delight
Patience is key now. Cover the dish and refrigerate for at least 4 hours, or overnight if you can—this gives the layers time to set and meld for that perfect slice. Once chilled, lift out a square and marvel at your masterpiece.
How to Serve Classic Cherry Delight
Garnishes
Classic Cherry Delight is a stunner on its own, but a little garnish never hurts! A dollop of whipped cream or a gentle sprinkle of grated chocolate makes each piece feel extra special. If you’re feeling fancy, a mint sprig or a few fresh cherries atop each square can really wow your guests.
Side Dishes
Even though this dessert steals the spotlight, it pairs beautifully with coffee, tea, or a small scoop of vanilla ice cream. If you’re serving Classic Cherry Delight at a potluck or family dinner, consider rounding out the dessert table with light lemon bars or crunchy almond cookies for contrast.
Creative Ways to Present
If you want to go beyond the classic 9×9-inch pan, try assembling Classic Cherry Delight in individual parfait glasses or mason jars—perfect for parties! Or, use a heart-shaped cutter and make sweet little cherry treats for Valentine’s Day or special occasions. The vibrant colors and layers look gorgeous no matter how you serve it.
Make Ahead and Storage
Storing Leftovers
Leftover Classic Cherry Delight keeps beautifully in the refrigerator. Just cover the dish with plastic wrap or transfer squares to an airtight container. It’ll stay fresh and creamy for up to five days, making it the ideal dessert to enjoy throughout the week.
Freezing
If you’re planning ahead or have extra to spare, you can freeze Classic Cherry Delight. Wrap the whole pan tightly in plastic wrap and then aluminum foil, or store individual squares in airtight containers. Let it thaw overnight in the fridge before serving—the texture remains wonderfully creamy.
Reheating
Since Classic Cherry Delight is meant to be chilled, there’s no need to reheat. In fact, a cold, creamy square straight from the fridge is when it tastes best! Just slice, serve, and enjoy the refreshing flavors as intended.
FAQs
Can I use homemade cherry topping instead of canned?
Absolutely! Homemade cherry pie filling gives Classic Cherry Delight an extra special touch. Simmer fresh or frozen cherries with sugar, a splash of lemon juice, and a little cornstarch until thickened. Let it cool completely before spreading over the cream cheese layer.
Is there a substitute for whipped topping?
You can use freshly whipped cream in place of store-bought whipped topping. Whip 1 cup of cold heavy cream with 2 tablespoons of powdered sugar until stiff peaks form, then fold into the cream cheese mixture just like you would with Cool Whip.
What if I want a firmer crust?
If you prefer a sturdier base, simply bake the crust at 350°F for 8 to 10 minutes and allow it to cool completely before adding the filling. This quick step can make a big difference in the final texture of your Classic Cherry Delight.
Can I use a different fruit topping?
Definitely! Classic Cherry Delight is versatile and welcomes blueberry, strawberry, or even peach pie filling. Just swap with equal amounts; you might discover a new favorite version!
How do I get neat, clean slices when serving?
For tidy squares, chill the dessert thoroughly and use a sharp knife dipped in hot water (and wiped dry between cuts). This helps you slice cleanly through those beautiful layers without smudging.
Final Thoughts
There’s just something magical about Classic Cherry Delight—each layer telling its own sweet story, coming together in a dessert that’s both comforting and showstopping. If you’ve never made it from scratch, now’s the perfect time to give it a try. Your family and friends will thank you, and your inner dessert lover will be over the moon!
Print
Classic Cherry Delight Recipe
- Total Time: 15 minutes (plus chilling)
- Yield: 9 servings 1x
- Diet: Non-Vegetarian
Description
Indulge in the creamy, fruity goodness of Classic Cherry Delight! This no-bake dessert features a luscious cream cheese layer on a crunchy graham cracker crust, topped with a generous helping of cherry pie filling. A perfect combination of flavors and textures in every bite.
Ingredients
Graham Cracker Crust:
- 1 1/2 cups graham cracker crumbs
- 1/4 cup granulated sugar
- 1/2 cup unsalted butter, melted
Cream Cheese Filling:
- 1 package (8 ounces) cream cheese, softened
- 1 cup powdered sugar
- 1 teaspoon vanilla extract
- 1 container (8 ounces) whipped topping (like Cool Whip)
Topping:
- 1 can (21 ounces) cherry pie filling
Instructions
- Graham Cracker Crust: In a medium bowl, mix graham cracker crumbs, granulated sugar, and melted butter until evenly combined. Press the mixture firmly into the bottom of a 9×9-inch baking dish to form the crust. Refrigerate while preparing the filling.
- Cream Cheese Filling: In a separate bowl, beat the softened cream cheese until smooth. Add powdered sugar and vanilla extract, and beat until creamy. Fold in the whipped topping until well combined.
- Assembly: Spread the cream cheese mixture evenly over the chilled crust. Top with cherry pie filling, spreading it out evenly. Cover and refrigerate for at least 4 hours, or overnight, to set. Serve chilled.
Notes
- You can substitute the cherry pie filling with blueberry, strawberry, or any fruit topping of your choice.
- For a firmer crust, bake it at 350°F for 8–10 minutes and let cool before adding the filling.
- Prep Time: 15 minutes
- Cook Time: 0 minutes
- Category: Dessert
- Method: No-Bake
- Cuisine: American
Nutrition
- Serving Size: 1 square
- Calories: 320
- Sugar: 22g
- Sodium: 210mg
- Fat: 19g
- Saturated Fat: 11g
- Unsaturated Fat: 6g
- Trans Fat: 0g
- Carbohydrates: 35g
- Fiber: 1g
- Protein: 3g
- Cholesterol: 35mg


