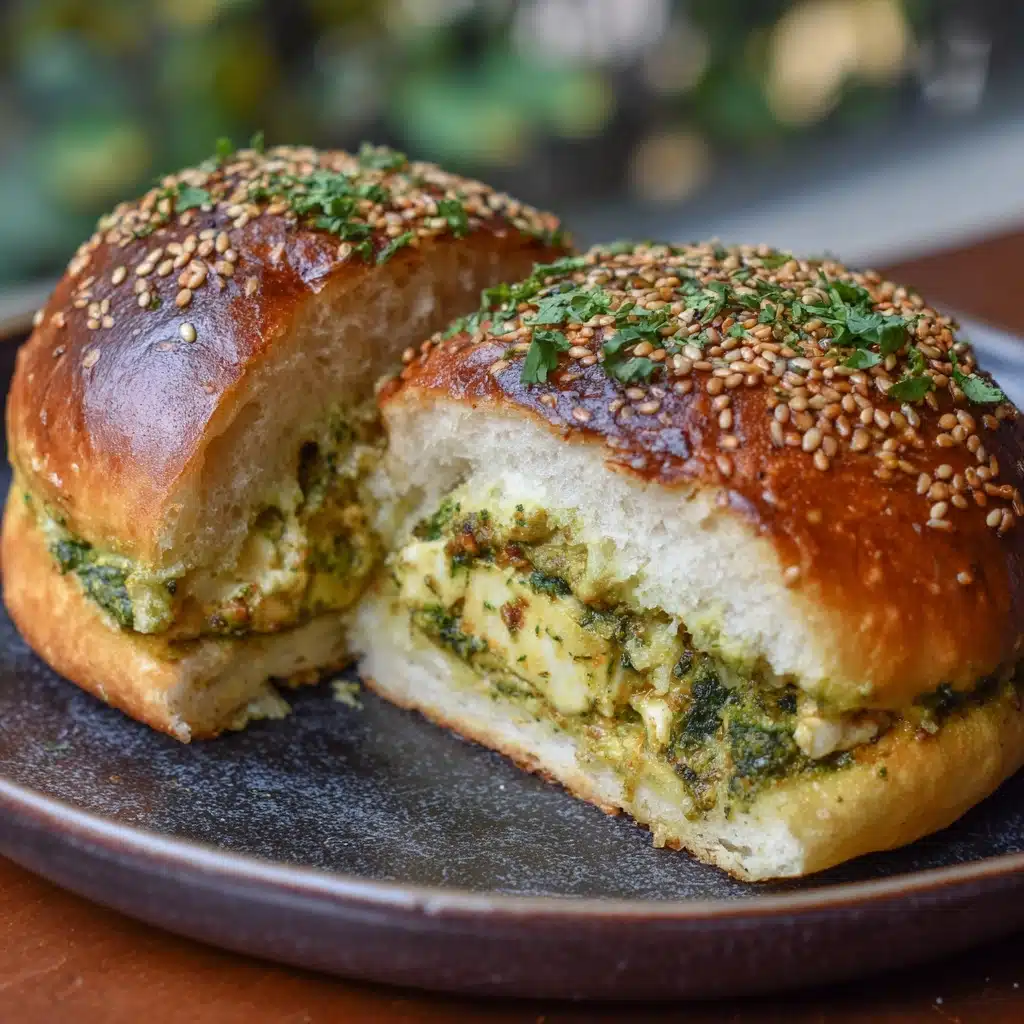
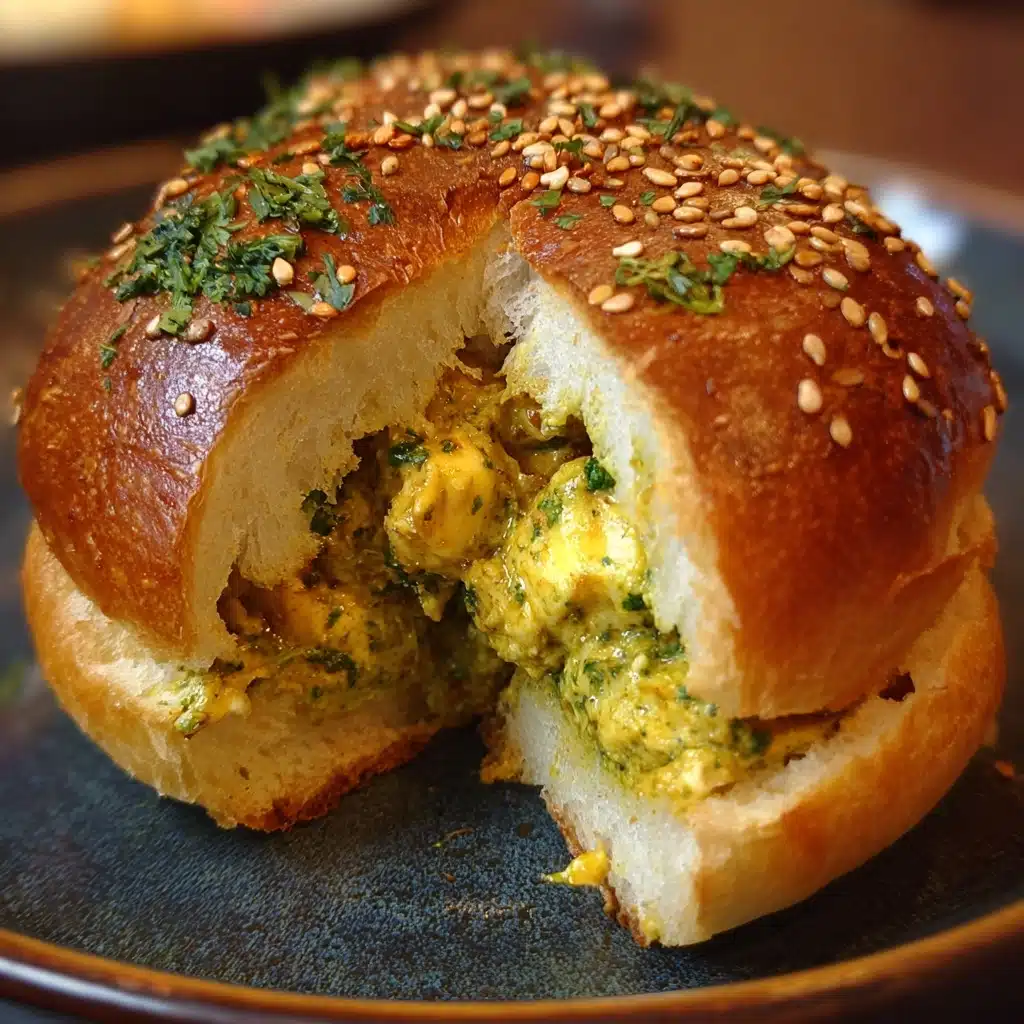
Cheesy Garlic Pesto Chicken Sliders Recipe
If you’re on the hunt for a mouthwatering crowd-pleaser that seamlessly blends bold Italian flavors with melty cheese and tender chicken, let me introduce you to Cheesy Garlic Pesto Chicken Sliders. These little sammies are positively irresistible: think juicy shredded chicken tossed in aromatic pesto and garlic, all smothered with gooey cheeses and tucked into warm, buttery slider buns. Perfect for parties, family dinners, or a fun weekend lunch, they’re speedy to assemble and absolutely loaded with comfort.
Ingredients You’ll Need
Making Cheesy Garlic Pesto Chicken Sliders couldn’t be easier, thanks to a handful of simple yet flavor-packed ingredients. Each element shines in its own way, coming together for that harmonious bite—melty, saucy, garlicky, and fresh all at once.
- Cooked Chicken Breast (1 pound, shredded): Go for store-bought rotisserie or leftover baked chicken for ultimate convenience and juicy texture.
- Slider Buns (8): Soft rolls work best to soak up all that cheesy, buttery flavor without falling apart.
- Basil Pesto (1/2 cup): Brings bold, herby richness and that signature pesto brightness to every bite.
- Garlic (3 cloves, minced): Fresh garlic adds a gentle punch and depth, tying everything together with aromatic warmth.
- Shredded Mozzarella Cheese (1 cup): Gives us that beautiful, stretchy melt factor—no slider is complete without it!
- Grated Parmesan Cheese (1/2 cup): Delivers tangy, salty goodness for extra dimension.
- Unsalted Butter (2 tablespoons, melted): Brushed on top for that golden, tempting finish.
- Olive Oil (1 tablespoon): Blended with butter to enhance flavor and crisp up the buns just right.
- Mayonnaise (1/4 cup): Keeps the chicken perfectly moist and helps meld all the flavors together.
- Salt and Pepper to taste: A simple seasoning duo, essential for balancing and boosting every other ingredient.
- Fresh Basil Leaves (optional, for garnish): Sprinkle on at the end for an eye-catching and aromatic touch that screams freshness.
How to Make Cheesy Garlic Pesto Chicken Sliders
Step 1: Preheat and Prep
Kick things off by preheating your oven to 350 degrees Fahrenheit. This temperature is your sweet spot—it gently warms the sliders, melts all that cheese, and toasts the buns to golden perfection without drying anything out. Grab a baking sheet that fits your slider rolls and line it with parchment for easy cleanup if you like.
Step 2: Mix the Chicken Filling
In a large mixing bowl, add the shredded chicken, basil pesto, minced garlic, mayonnaise, and a generous pinch of salt and pepper. Stir everything together until the chicken is evenly coated. That sticky, herby mix will be the flavorful foundation of your sliders and guarantees juicy, savory bites throughout.
Step 3: Prepare the Buns
Take your slider buns and slice them horizontally right through the middle—try to keep the individual buns connected, creating a “top” and “bottom” slab. This makes assembly (and later serving) a breeze. Place the bottom half on your prepared baking sheet.
Step 4: Assemble the Sliders
Spoon the chicken and pesto filling evenly over the bottom buns, making sure every slider gets its fair share. Next, sprinkle the shredded mozzarella and grated Parmesan cheese all over the top of the chicken mixture. Place the top half of the buns over everything to create neat little sandwiches.
Step 5: Add Buttery Goodness
In a small bowl, stir together your melted butter and olive oil. Then, using a pastry brush or spoon, generously paint this mixture over the tops of the slider buns. It will help crisp and golden the tops, all while infusing even more flavor.
Step 6: Bake to Perfection
Cover your assembled sliders loosely with aluminum foil—this lets the cheese melt while protecting the buns from getting too dark. Bake for 15 minutes, then remove the foil and let them bake for another 5 minutes. That last stretch unlocks that crave-worthy, golden-brown finish on top and gets the cheese bubbling away.
Step 7: Garnish and Serve
Once finished, remove the sliders from the oven and, if you’re feeling fancy, scatter a handful of fresh basil leaves over the tops. Slice or pull the sliders apart and serve them up while gooey and warm—definitely the best way to experience every cheesy, garlicky, pesto-packed bite.
How to Serve Cheesy Garlic Pesto Chicken Sliders
Garnishes
Crowning your sliders with a flourish of fresh basil leaves or an extra sprinkle of Parmesan not only enhances the look but also infuses an extra pop of flavor and aroma right before you dig in. A light dusting of crushed red pepper flakes also works wonders if you want a whisper of heat!
Side Dishes
Cheesy Garlic Pesto Chicken Sliders shine alongside crisp veggie sticks, a simply dressed green salad, or tangy tomato soup for a classic combo. They’re also wonderful with roasted potatoes or even some salty kettle chips for a more laid-back feast.
Creative Ways to Present
For parties, try threading a short skewer or fancy toothpick through each slider and pile them up on a rustic wooden board. Or, if serving family-style, arrange them neatly on a platter with small bowls of extra pesto and aioli for dipping. Want to impress? Make a mini slider tower for a playful (and Instagram-worthy) centerpiece.
Make Ahead and Storage
Storing Leftovers
If you’re lucky enough to have leftover Cheesy Garlic Pesto Chicken Sliders, let them cool to room temperature before storing in an airtight container in the refrigerator. They’ll stay fresh and tasty for up to three days—and honestly, are pretty dreamy even cold!
Freezing
You can absolutely freeze these sliders for quick munchies on demand. Wrap each slider tightly in foil or plastic wrap, then store together in a freezer bag for up to two months. When ready to enjoy, just thaw in the fridge overnight.
Reheating
To reheat, place sliders uncovered on a baking sheet and warm in a 325-degree Fahrenheit oven for 10–15 minutes, or until heated through and the cheese is gooey again. Microwaving works in a pinch, but you’ll get the best texture from the oven every time.
FAQs
Can I use chicken thighs instead of chicken breast?
Absolutely! Chicken thighs are juicy and flavorful, making them an excellent alternative. Just shred them well and proceed with the recipe as written.
What’s the best way to shred chicken for these sliders?
The easiest way is to use two forks to pull apart cooked chicken breasts. For a major time-saver, pop your chicken in a mixer with the paddle attachment on low—perfectly shredded in seconds!
Can I make Cheesy Garlic Pesto Chicken Sliders ahead of time?
Yes, you can assemble the sliders (without baking) a few hours ahead. Cover and refrigerate, then bake fresh just before serving for maximum gooeyness and best results.
Is it possible to make this recipe gluten-free?
Definitely! Just use your favorite gluten-free slider buns—the texture and flavor are still fantastic, and all the other ingredients are naturally gluten-free.
Could I swap out the pesto for something else?
You sure can. Try sun-dried tomato pesto for a bolder, slightly tangy twist, or experiment with arugula pesto, spinach pesto, or even a jarred chimichurri for a unique spin.
Final Thoughts
There’s a special kind of magic in a baking tray filled with warm, cheesy Cheesy Garlic Pesto Chicken Sliders. With each bite, you’ll get juicy chicken, garlicky pesto, and all that luscious, stringy cheese—and I can’t wait for you to taste just how wonderful they are. Give these sliders a try the next time you’re feeding friends, celebrating with family, or just craving a fun, comforting meal. I know they’ll become a regular in your kitchen!
Print
Cheesy Garlic Pesto Chicken Sliders Recipe
- Total Time: 30 minutes
- Yield: 8 sliders 1x
- Diet: Non-Vegetarian
Description
These Cheesy Garlic Pesto Chicken Sliders are a delicious combination of tender chicken, flavorful pesto, and gooey cheese, all nestled in soft slider buns. Perfect for a quick and tasty meal or as a party snack!
Ingredients
For the sliders:
- 1 pound cooked chicken breast, shredded
- 8 slider buns
- 1/2 cup basil pesto
- 3 cloves garlic, minced
- 1/4 cup mayonnaise
- Salt and pepper to taste
For the topping:
- 1 cup shredded mozzarella cheese
- 1/2 cup grated Parmesan cheese
- 2 tablespoons unsalted butter, melted
- 1 tablespoon olive oil
- Fresh basil leaves for garnish (optional)
Instructions
- Preheat the oven: Preheat the oven to 350 degrees Fahrenheit.
- Prepare the chicken mixture: In a bowl, mix shredded chicken, basil pesto, minced garlic, mayonnaise, salt, and pepper.
- Assemble the sliders: Slice the buns, spread chicken mixture on the bottom halves, add cheeses, cover with top halves, and brush with butter and oil mixture.
- Bake: Cover sliders with foil, bake for 15 minutes, then uncover and bake for 5 more minutes until cheese is melted and tops are golden.
- Serve: Garnish with basil leaves and serve warm.
Notes
- Use rotisserie chicken for a quick shortcut.
- Swap basil pesto with sun-dried tomato pesto for a different flavor.
- For extra heat, add red pepper flakes to the chicken mixture.
- Prep Time: 10 minutes
- Cook Time: 20 minutes
- Category: Main Course, Snack
- Method: Baking
- Cuisine: American, Italian
Nutrition
- Serving Size: 1 slider
- Calories: 280
- Sugar: 2 grams
- Sodium: 480 mg
- Fat: 14 grams
- Saturated Fat: 6 grams
- Unsaturated Fat: 7 grams
- Trans Fat: 0 grams
- Carbohydrates: 22 grams
- Fiber: 1 gram
- Protein: 18 grams
- Cholesterol: 60 mg


