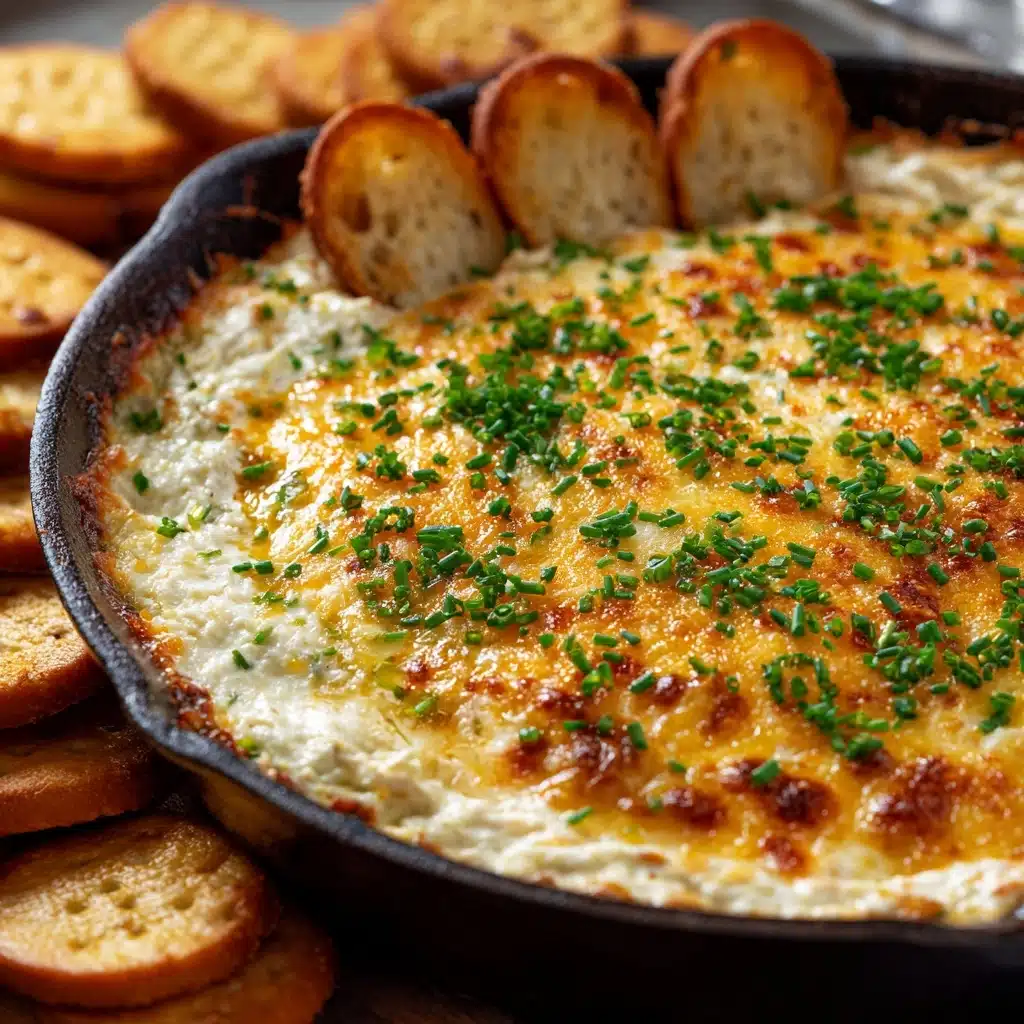
Cheesy Chive Warm Dip Recipe
If you’re looking for a crowd-pleasing appetizer that’s easy to make yet feels extra special, this Cheesy Chive Warm Dip absolutely delivers. With a base of creamy cheeses, the freshness of chopped chives, and a golden, bubbly finish, it’s the ultimate “everyone wants the recipe” snack for parties, game nights, or cozy evenings at home. Best of all, this dip comes together quickly, can be made ahead, and never fails to disappear the moment you set it out.

Ingredients You’ll Need
Gathering the basics yields delicious rewards. Each ingredient in this Cheesy Chive Warm Dip plays a unique role, from binding the dip with velvety smoothness to adding irresistible flavor pops and stretchy cheese pulls.
- Cream Cheese (8 ounces, softened): The creamy, tangy base binds everything and ensures every scoop is luxuriously smooth.
- Sour Cream (1 cup): Brings a delightful tang and lightens the texture for perfect dippability.
- Sharp Cheddar Cheese (1 cup, shredded): Packs a punch of bold, nutty flavor and creates a classic, cheesy melt.
- Mozzarella Cheese (1/2 cup, shredded): Gives that signature gooey stretch when the dip is piping hot.
- Parmesan Cheese (1/4 cup, grated): Adds salty, savory depth and that essential golden crust on top.
- Fresh Chives (3 tablespoons, chopped): Deliver a gentle onion note and bursts of herby freshness.
- Garlic (2 cloves, minced): Infuses a mellow, aromatic kick that rounds out all the cheesy richness.
- Onion Powder (1/2 teaspoon): Boosts all the savory notes and blends seamlessly.
- Black Pepper (1/4 teaspoon): Adds the right touch of warmth without overpowering other flavors.
- Salt (1/4 teaspoon): Balances the cheeses and lets each ingredient shine.
- Extra Chopped Chives (for garnish): Lay these on top at the end for color and that unmistakable fresh flavor.
How to Make Cheesy Chive Warm Dip
Step 1: Preheat the Oven
Begin by preheating your oven to 375°F (190°C). This temperature is perfect for bubbling the cheeses and achieving a golden, craveable top without drying out any of the creamy goodness underneath.
Step 2: Mix the Base
In a medium mixing bowl, add the softened cream cheese and sour cream first. Beat them together until smooth, so you don’t end up with any lumps later. Then mix in the shredded cheddar, mozzarella, Parmesan, fresh chopped chives, minced garlic, onion powder, black pepper, and salt. Make sure everything is evenly combined—this is the magic moment when all those flavors come together.
Step 3: Assemble in Baking Dish
Transfer the mixture into a small baking dish or ovenproof skillet, using a spatula to smooth the top for an even layer. This step ensures every bite bakes up bubbling and perfectly golden.
Step 4: Bake Until Bubbling
Pop the dish in the oven and bake for 20 to 25 minutes. You’ll know it’s ready when the top is lightly golden and you see little bubbles around the edges. The aroma at this stage will have everyone circling the kitchen in anticipation!
Step 5: Garnish and Serve
Once baked, remove the dip from the oven and immediately sprinkle extra chopped chives over the top. The vibrant green is not only pretty but gives a burst of freshness with every scoop. Serve warm with your favorite dippers.
How to Serve Cheesy Chive Warm Dip
Garnishes
A simple finishing touch of extra chopped chives makes this Cheesy Chive Warm Dip both eye-catching and inviting. If you want to get extra fancy, try adding a sprinkle of red pepper flakes or a dusting of smoked paprika for a hint of color and a subtle kick.
Side Dishes
This dip is the life of any snack table! Surround the warm baking dish with a selection of crisp crackers, toasted baguette slices, or fresh veggie sticks like carrots, bell peppers, and cucumbers. The contrast between the creamy dip and crunchy sides is completely addictive.
Creative Ways to Present
If you feel like upping your presentation game, bake the Cheesy Chive Warm Dip in mini ramekins for individual portions, or hollow out a rustic bread boule and use it as an edible bowl! It also looks charming served right from a cast iron skillet for that homey, rustic flair.
Make Ahead and Storage
Storing Leftovers
Any leftovers of Cheesy Chive Warm Dip can be cooled, covered, and tucked into the fridge for up to 3 days. The flavors only get deeper and more delicious, making second-day snacking hard to resist.
Freezing
While technically you can freeze this dip, the texture of the dairy can change slightly upon thawing. If you do decide to freeze, place it in a freezer-safe, airtight container. Thaw overnight in the refrigerator before reheating for best results.
Reheating
Gently reheat leftovers in a 350°F oven until warmed through and cheesy again—usually about 10-15 minutes. For single servings, a few short zaps in the microwave works great too. Always garnish with fresh chives after reheating to bring back the vibrant flavor.
FAQs
Can I make Cheesy Chive Warm Dip ahead of time?
Absolutely! You can mix all the ingredients, spread it in the baking dish, and cover it in the fridge up to 24 hours ahead. Just bake it straight from the fridge, adding a couple extra minutes if needed.
Can I add extra mix-ins?
Yes! Stir in crispy bacon crumbles, caramelized onions, or even a handful of chopped jalapeños for extra flair and deeper flavor. This base is super versatile for your favorite add-ins.
Is Cheesy Chive Warm Dip gluten-free?
The dip itself is gluten-free as written, as long as you use gluten-free dippers. Always double-check labels if you’re serving guests with gluten sensitivities.
What should I do if I don’t have fresh chives?
Dried chives work in a pinch, but use about one-third the amount, as their flavor is milder. Alternatively, thinly sliced green onions or finely chopped parsley could stand in for a similar hit of freshness.
Can I double the recipe?
Certainly! Simply double every ingredient and use a larger baking dish. The bake time may increase slightly, so watch for that golden, bubbling top as your cue to serve.
Final Thoughts
There’s something truly special about sharing a bubbling dish of Cheesy Chive Warm Dip with people you love. Every time you serve it, expect empty plates and plenty of recipe requests! Give this recipe a try at your next gathering and watch the magic happen—one irresistibly cheesy scoop at a time.
Print
Cheesy Chive Warm Dip Recipe
- Total Time: 35 minutes
- Yield: 8 servings 1x
- Diet: Vegetarian
Description
This Cheesy Chive Warm Dip is a creamy and flavorful appetizer that’s perfect for parties or gatherings. With a blend of cream cheese, cheddar, mozzarella, and Parmesan cheeses, along with fresh chives and garlic, this dip is rich and satisfying. Baked until golden and bubbly, it’s best served warm with your favorite dippers.
Ingredients
Cheesy Chive Warm Dip:
- 8 ounces cream cheese, softened
- 1 cup sour cream
- 1 cup shredded sharp cheddar cheese
- 1/2 cup shredded mozzarella cheese
- 1/4 cup grated Parmesan cheese
- 3 tablespoons fresh chives, chopped
- 2 cloves garlic, minced
- 1/2 teaspoon onion powder
- 1/4 teaspoon black pepper
- 1/4 teaspoon salt
For Garnish:
- Extra chopped chives
Instructions
- Preheat the oven: Preheat the oven to 375°F (190°C).
- Mix ingredients: In a medium bowl, combine cream cheese, sour cream, cheddar, mozzarella, Parmesan, chives, garlic, onion powder, black pepper, and salt. Mix until smooth.
- Bake: Transfer the mixture to a baking dish, bake for 20–25 minutes until hot and bubbly with a golden top.
- Garnish and serve: Garnish with extra chives before serving. Enjoy warm with crackers, baguette slices, or vegetable sticks.
Notes
- You can prepare the dip ahead of time and refrigerate, then bake just before serving.
- For extra flavor, stir in cooked bacon crumbles or caramelized onions.
- Prep Time: 10 minutes
- Cook Time: 25 minutes
- Category: Appetizer
- Method: Baking
- Cuisine: American
Nutrition
- Serving Size: 1/4 cup
- Calories: 220
- Sugar: 2 g
- Sodium: 310 mg
- Fat: 19 g
- Saturated Fat: 11 g
- Unsaturated Fat: 7 g
- Trans Fat: 0 g
- Carbohydrates: 4 g
- Fiber: 0 g
- Protein: 7 g
- Cholesterol: 45 mg

