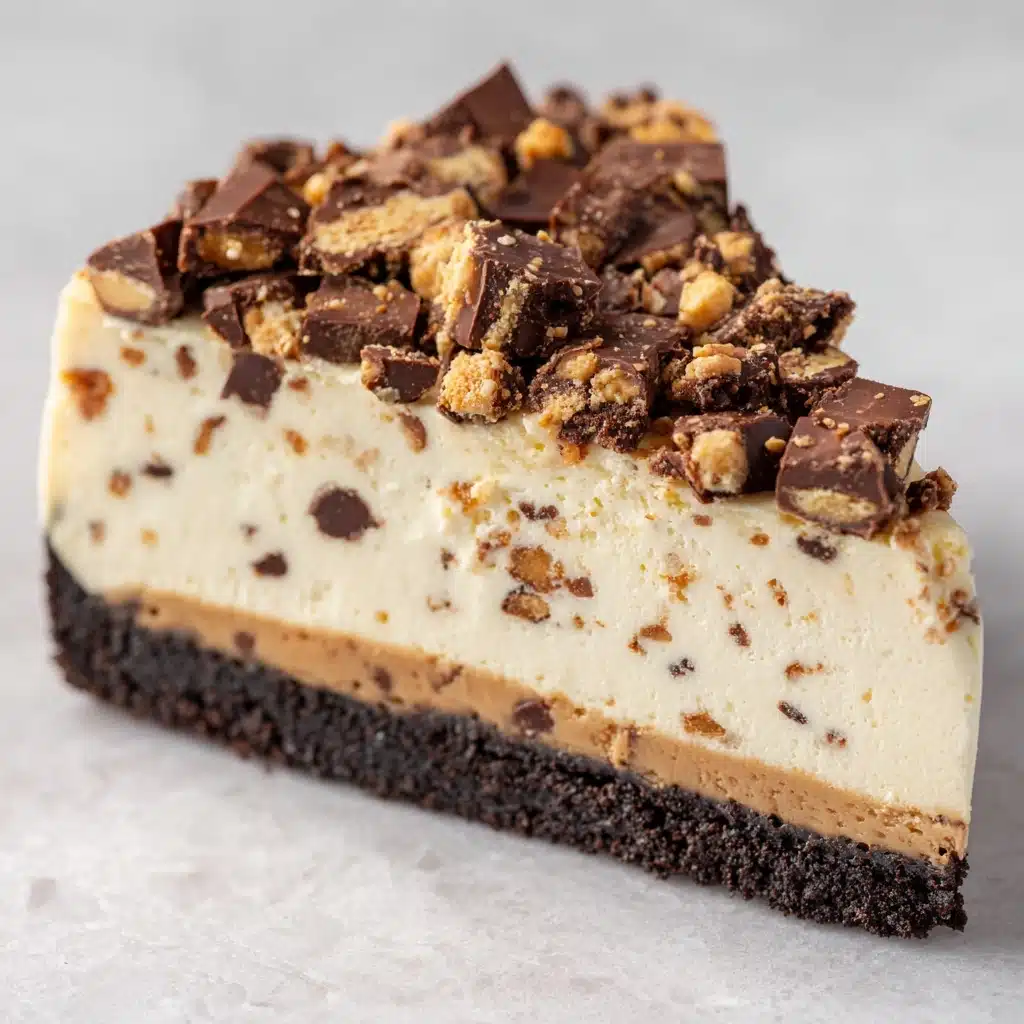
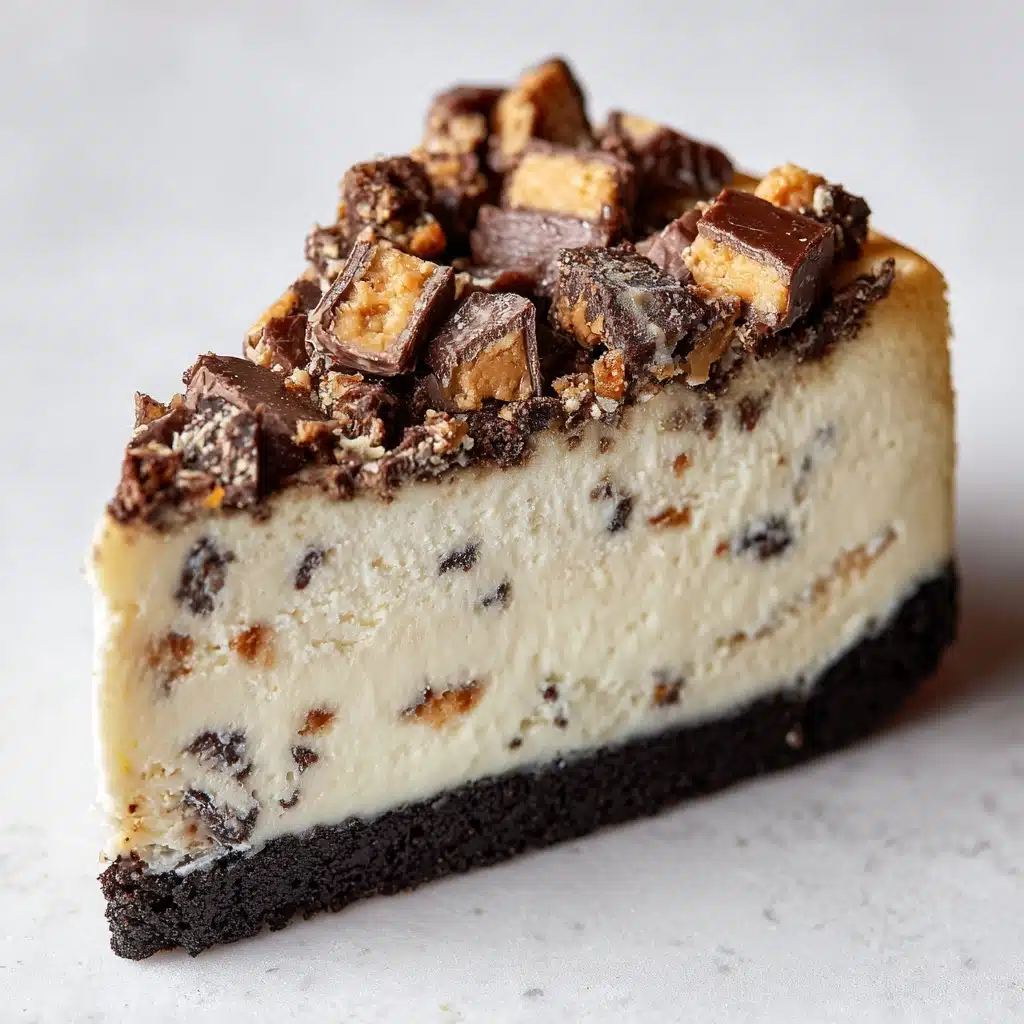
Butterfinger Pie (No-Bake) Recipe
If you’re craving a dessert that’s rich, creamy, and loaded with irresistible candy bar crunch, this Butterfinger Pie (No-Bake) is the answer to your sweetest dreams! Imagine velvety cream cheese and fluffy whipped topping blended with plenty of crushed Butterfinger bars, all nestled in your favorite pie crust. There’s zero oven time required, so this treat is as easy as it is decadent—a show-stopping pie that always disappears fast at potlucks, family dinners, or any celebration where you want smiles all around.
Ingredients You’ll Need
What makes Butterfinger Pie (No-Bake) such a crowd-pleaser is its short ingredient list—each one plays a big role in the final flavor and texture. No fancy steps, no hidden tricks, just simple layers of creamy, crunchy, peanut-buttery goodness!
- Softened Cream Cheese (8 oz): Start with room temperature cream cheese for a lump-free, ultra-smooth filling.
- Powdered Sugar (1/2 cup): This melts right into the filling and adds just the right touch of sweetness.
- Whipped Topping (8 oz, like Cool Whip): It makes the pie light, airy, and perfectly sliceable—don’t skip it!
- Crushed Butterfinger Candy Bars (1 1/2 cups, about 4 bars): The main event! They bring that classic peanut butter crunch and caramelized flavor.
- Prepared Chocolate or Graham Cracker Pie Crust: Either option adds a delicious, sturdy base that comes ready for filling—super convenient.
- Extra Crushed Butterfinger for Topping: A generous sprinkle on top makes every slice look—and taste—irresistible.
How to Make Butterfinger Pie (No-Bake)
Step 1: Cream the Base
In a large mixing bowl, beat together your softened cream cheese and powdered sugar. Take a minute or two to really whip it up until the mixture is silky and smooth—this is the backbone of the pie’s signature creamy texture!
Step 2: Fold in the Fluff
Next up, gently fold in the whipped topping using a spatula or large spoon. Aim for a light, airy blend here; you want everything well-combined but don’t overmix or you’ll lose some of that dreamy fluffiness.
Step 3: Add the Butterfinger Magic
Now, it’s time to add the real star—crushed Butterfinger candy bars. Stir them in, being sure to reserve a few tablespoons for a beautiful topping later. You’ll see those golden shards dotting the creamy filling and know you’re in for a treat!
Step 4: Fill and Garnish the Pie
Spoon the mixture into your prepared pie crust. Smooth the top with a spatula until you have an even, luscious layer. Sprinkle the reserved Butterfinger pieces generously over the top for extra crunch and irresistible candy bar appeal.
Step 5: Chill for the Win
Cover the pie with plastic wrap or a pie lid and refrigerate for at least 4 hours, or until firm and set. This waiting period is where all the flavors meld and the pie becomes slice-perfect!
How to Serve Butterfinger Pie (No-Bake)
Garnishes
While Butterfinger Pie (No-Bake) is dazzling all on its own, a light drizzle of melted peanut butter or chocolate takes it to gourmet levels. A dollop of whipped cream and a few extra Butterfinger crumbles never hurt, either!
Side Dishes
To balance out the decadent sweetness, serve each slice alongside a cup of coffee or a tall glass of milk. For a picnic or party spread, fresh berries or a fruit salad make wonderfully bright companions to the rich, crunchy pie.
Creative Ways to Present
If you want to really wow your guests, try making individual Butterfinger Pie (No-Bake) parfaits: layer the filling, pie crust crumbs, and toppings in little jars or glasses. You can also shape mini pies using muffin tins—adorable and perfect for parties!
Make Ahead and Storage
Storing Leftovers
Store any leftover Butterfinger Pie (No-Bake) covered in the refrigerator. It will easily keep fresh and delicious for up to 4 days, though its texture is at its best within the first couple of days.
Freezing
To extend the magic even further, you can freeze Butterfinger Pie (No-Bake) for up to one month. Just wrap the whole pie or individual slices tightly in plastic wrap and a layer of foil. Thaw overnight in the fridge before serving for the best texture.
Reheating
No need to reheat this pie—Butterfinger Pie (No-Bake) is all about enjoying that cool, creamy filling right from the fridge! If it’s been frozen, simply allow it to thaw until soft enough to slice and savor.
FAQs
Can I use homemade whipped cream instead of store-bought whipped topping?
Absolutely! Whip 1 cup of heavy cream with 2 tablespoons of powdered sugar to soft peaks and use as a substitute. Just keep in mind that homemade whipped cream may result in a slightly softer filling, so chill time is key.
Which pie crust is better: chocolate or graham cracker?
Both work wonderfully! Chocolate crust amps up the candy-bar vibes, while graham cracker adds a classic, buttery crunch. Pick whichever makes your taste buds happiest or alternate for fun variations.
Can I make Butterfinger Pie (No-Bake) ahead of time?
Yes, this recipe is perfect for prepping ahead! You can assemble the pie up to two days before serving and keep it chilled. The flavors actually improve as it sits, making it a true make-ahead gem.
Are there any nut-free alternatives to Butterfinger bars?
If you need to skip peanuts, try using toffee bars or crispy chocolate candies instead. While it won’t be exactly the same, you’ll still get a delightful snappy crunch throughout the pie.
Can I double the recipe for a crowd?
Definitely! This recipe can easily be doubled and spread between two pie crusts for parties and gatherings. Just remember that two pies might require a bit of extra chilling space in your fridge!
Final Thoughts
If you love easy, showstopping desserts, you must try this Butterfinger Pie (No-Bake). It’s pure happiness in every creamy, crunchy bite, and I promise it’ll become a new favorite in your home just like it is in mine. Gather your candy bars and get ready to indulge—you (and your lucky taste testers) won’t be disappointed!
Print
Butterfinger Pie (No-Bake) Recipe
- Total Time: 4 hours 10 minutes
- Yield: 8 slices 1x
- Diet: Non-Vegetarian
Description
Indulge in the creamy, crunchy goodness of this no-bake Butterfinger Pie, a decadent dessert that combines the rich flavors of cream cheese, whipped topping, and crushed Butterfinger candy bars in a chocolate or graham cracker crust.
Ingredients
Cream Cheese Mixture:
- 1 (8 oz) package cream cheese, softened
- 1/2 cup powdered sugar
- 1 (8 oz) tub whipped topping (like Cool Whip)
Filling and Crust:
- 1 1/2 cups crushed Butterfinger candy bars (about 4 regular bars)
- 1 prepared chocolate or graham cracker pie crust
- Extra crushed Butterfinger for topping
Instructions
- In a large bowl, beat the softened cream cheese and powdered sugar together until smooth and creamy. Gently fold in the whipped topping until fully combined.
- Stir in the crushed Butterfinger candy bars, reserving a few tablespoons for garnish.
- Spoon the mixture into the prepared pie crust and spread evenly. Sprinkle the reserved Butterfinger pieces over the top.
- Cover and refrigerate for at least 4 hours or until firm. Slice and serve chilled.
Notes
- For even more peanut butter flavor, drizzle melted peanut butter or chocolate over the top before serving.
- This pie can be made up to 2 days in advance.
- Prep Time: 10 minutes
- Cook Time: 0 minutes
- Category: Dessert
- Method: No-Bake
- Cuisine: American
Nutrition
- Serving Size: 1 slice
- Calories: 390
- Sugar: 28g
- Sodium: 260mg
- Fat: 25g
- Saturated Fat: 13g
- Unsaturated Fat: 10g
- Trans Fat: 0g
- Carbohydrates: 35g
- Fiber: 1g
- Protein: 5g
- Cholesterol: 35mg


