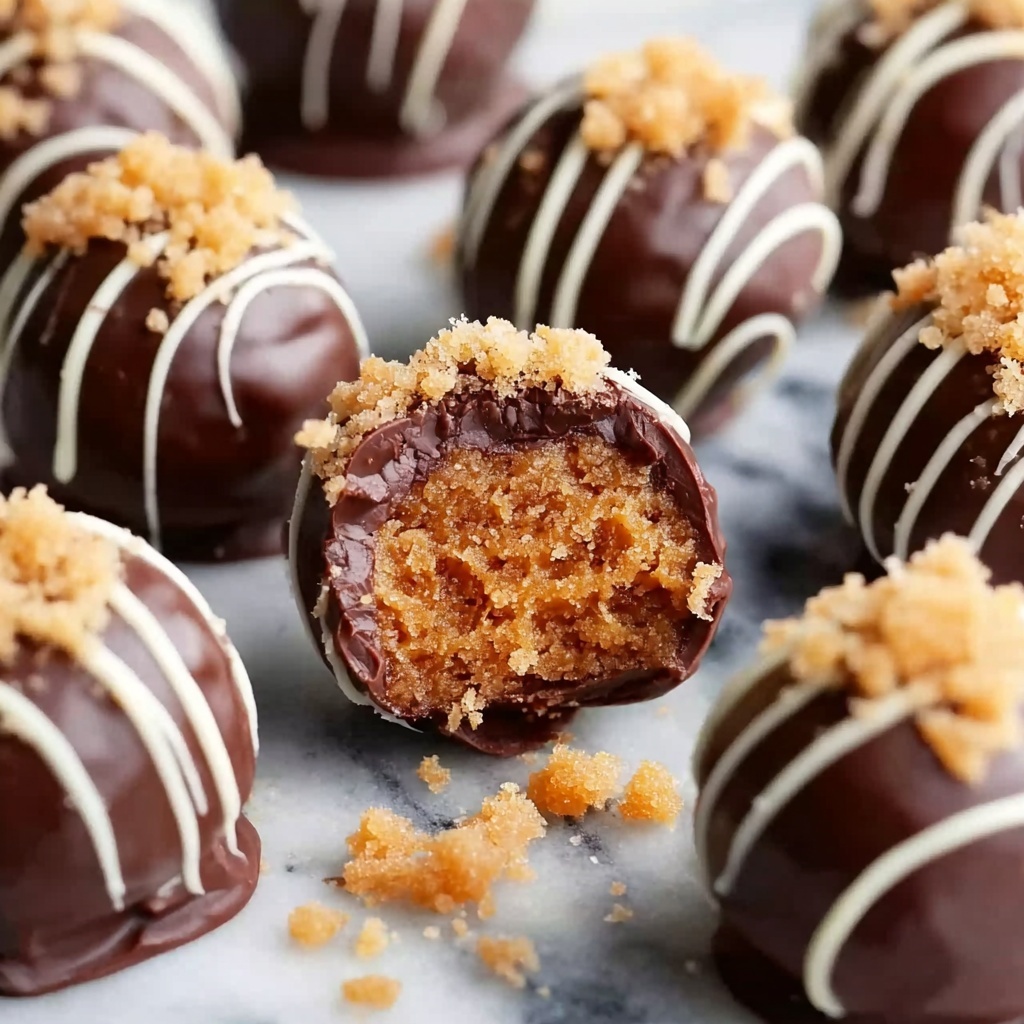
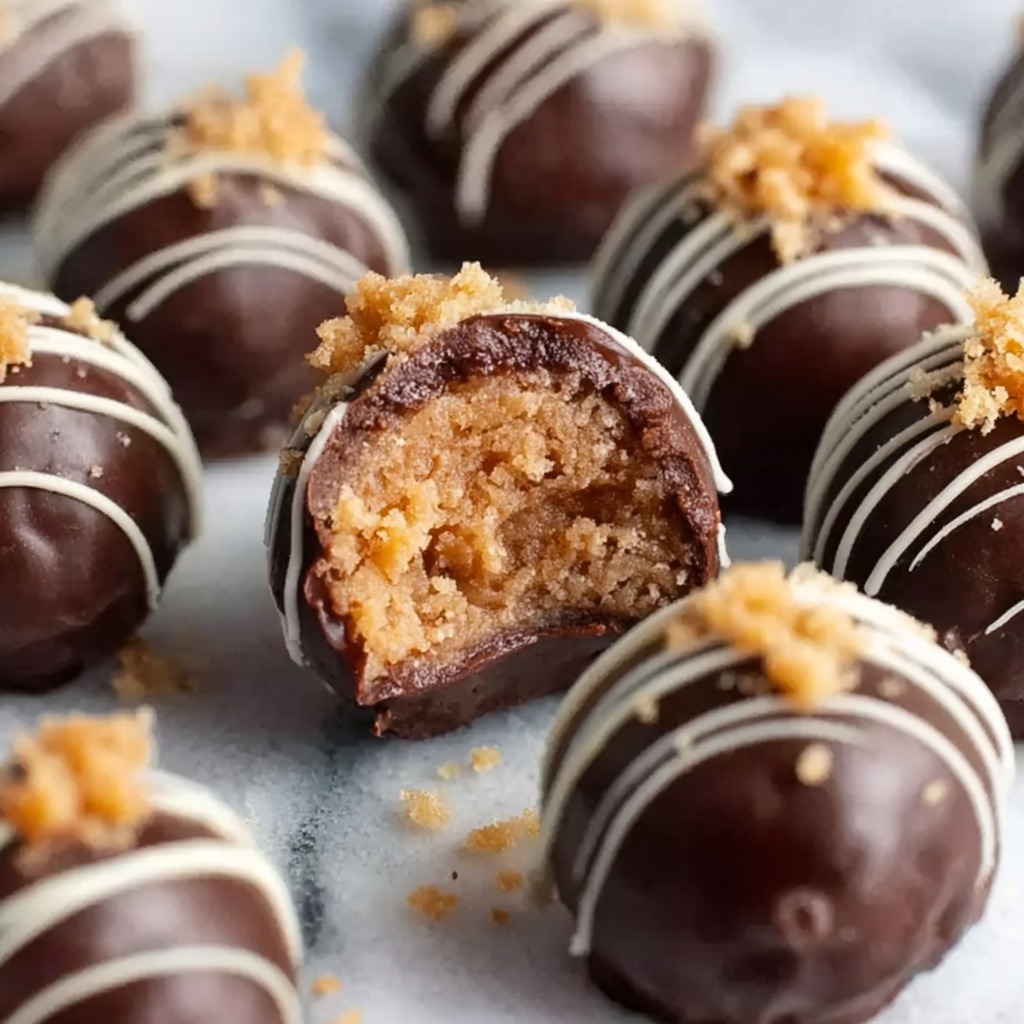
If you have a sweet tooth and a love for all things rich and crunchy, the Butterfinger Balls Recipe is here to become your new favorite treat. Imagine biting into a luscious peanut butter and buttery crumb center, studded with chunks of Butterfinger candy bars, all coated in a smooth, glossy layer of chocolate. These bite-sized delights are delightfully easy to make, perfectly portioned, and burst with flavor in every mouthful. Whether you’re making them for a holiday party, a family gathering, or just a cozy night in, this Butterfinger Balls Recipe will fill your kitchen with irresistible aromas and your heart with joy.
Ingredients You’ll Need
This recipe calls for simple, staple ingredients that come together to create a texture and flavor sensation. Each component adds its own magic—from the sweet powdery sugar to the crunchy peanut butter, and of course, the star Butterfinger bars that bring that unforgettable crunch.
- Powdered sugar: Provides a sweet, smooth base that balances the rich peanut butter perfectly.
- Graham cracker crumbs: Adds a slightly crunchy texture and subtle sweetness.
- Butterfinger bars, crushed: The key ingredient offering that classic Butterfinger flavor and crispiness inside.
- Butter, melted: Helps bind everything together for a creamy consistency.
- Crunchy peanut butter: Adds depth, nuttiness, and an irresistible texture contrast.
- Chocolate almond bark or candy coating: Coats the balls in a luscious, smooth chocolate shell that hardens beautifully.
How to Make Butterfinger Balls Recipe
Step 1: Mix Ingredients
Start by combining the powdered sugar, graham cracker crumbs, crushed Butterfinger bars, melted butter, and crunchy peanut butter in a large bowl. Use a sturdy spoon or your hands to mix everything evenly until the mixture sticks together well. This blend is the foundation of your Butterfinger Balls, so make sure the ingredients are fully incorporated for that perfect bite every time.
Step 2: Form Balls
Next, roll the mixture into 1-inch balls. Don’t worry if they’re not perfectly round—each little ball is unique and full of personality! Place them on a baking sheet lined with parchment paper, giving them some breathing room so they don’t stick together.
Step 3: Chill
Pop the baking sheet in the refrigerator and let the balls chill for about 30 minutes. This step is crucial because it firms them up, making the next step—the chocolate coating—much easier and less messy. Plus, it helps the flavors meld together beautifully.
Step 4: Melt Chocolate
While the balls are chilling, melt your chocolate almond bark or preferred candy coating according to the package instructions. Whether you use a microwave or double boiler, aim for a smooth, glossy finish that will coat each ball perfectly.
Step 5: Dip Balls
One by one, dip each chilled ball into the warm chocolate, using a fork or dipping tool to ensure they get fully covered in that luscious chocolate layer. Let the excess chocolate drip off before placing the coated balls back onto the parchment-lined tray. This stage transforms your little peanut butter concoctions into elegant, chocolate-covered gems.
Step 6: Set Chocolate
Finally, allow the chocolate to set completely. You can leave the tray at room temperature if your kitchen is cool, or put it back in the fridge to speed up the process. Once set, your Butterfinger Balls are ready to enjoy or gift!
How to Serve Butterfinger Balls Recipe

Garnishes
For an extra special touch, sprinkle a pinch of sea salt or finely crushed Butterfinger pieces on top of the chocolate before it hardens. This adds a delightful crunch and visual appeal that will impress anyone lucky enough to try them.
Side Dishes
These Butterfinger Balls are delicious on their own but pair wonderfully with a cold glass of milk or a fluffy cup of coffee. They also make a sweet companion to simple vanilla ice cream or a fresh fruit platter for a balanced dessert experience.
Creative Ways to Present
Try arranging the Butterfinger Balls in mini cupcake liners or a decorative box lined with tissue paper for gift-giving occasions. You could even stack them into a pyramid on a party platter for a stunning dessert centerpiece. Presentation matters, and these treats deserve to be shown off!
Make Ahead and Storage
Storing Leftovers
If you have any Butterfinger Balls left over, store them in an airtight container in the refrigerator. They will stay fresh and delicious for up to one week, making them a convenient and indulgent snack whenever the craving strikes.
Freezing
You can freeze Butterfinger Balls by placing them in a single layer on a parchment-lined tray and freezing until solid. Then transfer them to a freezer-safe container or bag. They’ll keep well for up to two months, perfect for preparing ahead for special occasions or unexpected guests.
Reheating
No need to reheat these chocolate-covered treasures. Simply take them out of the fridge or freezer and allow them to come to room temperature for 10-15 minutes before serving. This way, the chocolate regains its perfect texture and the flavors shine through.
FAQs
Can I use a different type of peanut butter?
Absolutely! While crunchy peanut butter adds a nice texture contrast, creamy peanut butter can also be used if that’s what you prefer. Just keep in mind the consistency might be slightly softer.
What if I can’t find chocolate almond bark?
Substitute with any candy or coating chocolate that melts well and hardens into a smooth shell. Semi-sweet or milk chocolate chips are great alternatives.
Are Butterfinger Balls recipe nut-free?
No, this recipe contains peanut butter and Butterfinger bars, which have nuts. It is not suitable for people with nut allergies.
Can I make these smaller or larger?
Yes! You can adjust the size of the balls to suit your preference. Just remember that smaller balls will chill and set faster, while larger ones may need a bit more time.
How long do Butterfinger Balls last at room temperature?
Because of the butter and peanut butter content, it’s best to keep them refrigerated and avoid leaving them out at room temperature for longer than a couple of hours to maintain freshness and texture.
Final Thoughts
There’s something truly special about a homemade treat that’s both nostalgic and fresh. This Butterfinger Balls Recipe is a guaranteed crowd-pleaser, blending simple ingredients into bite-sized moments of bliss. Whether you’re making them for yourself, family, or friends, you’ll feel proud and delighted by every delicious ball you pop in your mouth. Give this recipe a try and get ready to make some sweet memories!
Print
Butterfinger Balls Recipe
- Prep Time: 15 minutes
- Cook Time: 0 minutes
- Total Time: 45 minutes
- Yield: 40 servings
- Category: Dessert
- Method: No-Cook
- Cuisine: American
Description
Delight in these rich and crunchy Butterfinger Balls, a no-bake treat combining crushed Butterfinger bars, crunchy peanut butter, and graham cracker crumbs coated in smooth chocolate. Perfect for parties or a sweet snack, these bite-sized balls offer a nostalgic candy bar flavor with an easy-to-make recipe requiring chilling and dipping.
Ingredients
Dry Ingredients
- 1 (16-oz) box powdered sugar
- 2½ cups graham cracker crumbs
- 5 (1.9-oz) Butterfinger bars, crushed
Wet Ingredients
- 1¼ cups butter, melted
- 1½ cups crunchy peanut butter
Coating
- 1 (24-oz) package chocolate almond bark or preferred chocolate candy coating
Instructions
- Mix Ingredients: In a large bowl, combine the powdered sugar, graham cracker crumbs, crushed Butterfinger bars, melted butter, and crunchy peanut butter. Stir thoroughly until all components are well incorporated into a uniform mixture.
- Form Balls: Using your hands or a small scoop, roll the mixture into 1-inch diameter balls. Place each ball evenly spaced on a baking sheet lined with parchment paper to prevent sticking.
- Chill: Refrigerate the formed balls for 30 minutes. This cooling period firms them up, making them easier to handle during the chocolate coating process.
- Melt Chocolate: Prepare the chocolate coating by melting the chocolate almond bark or your chosen chocolate candy coating according to the package instructions, typically using a microwave or double boiler until smooth and glossy.
- Dip Balls: One by one, dip each chilled ball into the melted chocolate, ensuring full coverage. Use a fork or dipping tool to lift the balls and allow excess chocolate to drip off before placing them back onto a parchment-lined sheet.
- Set Chocolate: Allow the chocolate coating to cool and harden completely at room temperature or in the refrigerator before serving to ensure a crisp shell around the creamy interior.
Notes
- For best results, ensure the Butterfinger bars are crushed finely to allow an even texture in the balls.
- Store the finished Butterfinger Balls in an airtight container in the refrigerator for up to one week.
- Use parchment paper or wax paper to prevent sticking during chilling and coating stages.
- Chocolate almond bark or candy coating is recommended for a smooth, easy-to-melt finish.
- To speed up chocolate setting, refrigerate the coated balls after dipping.


