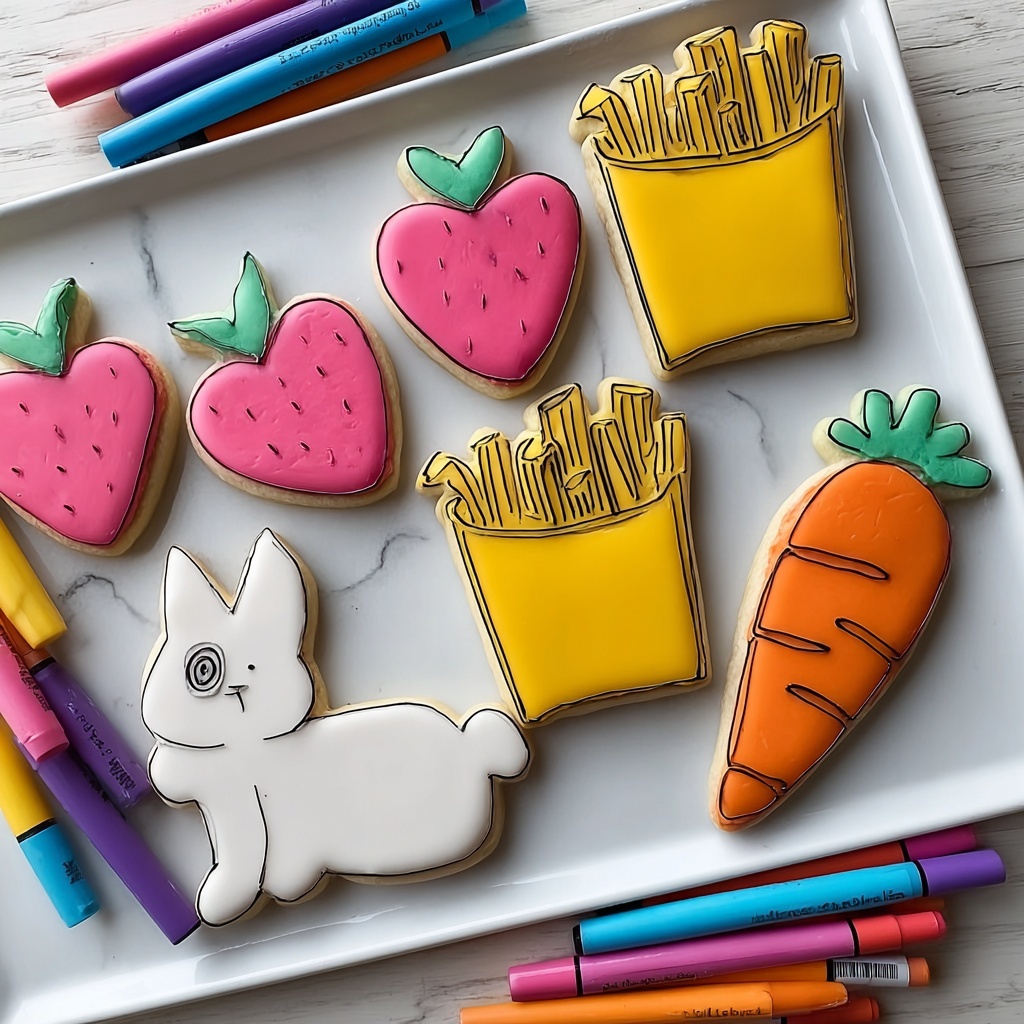
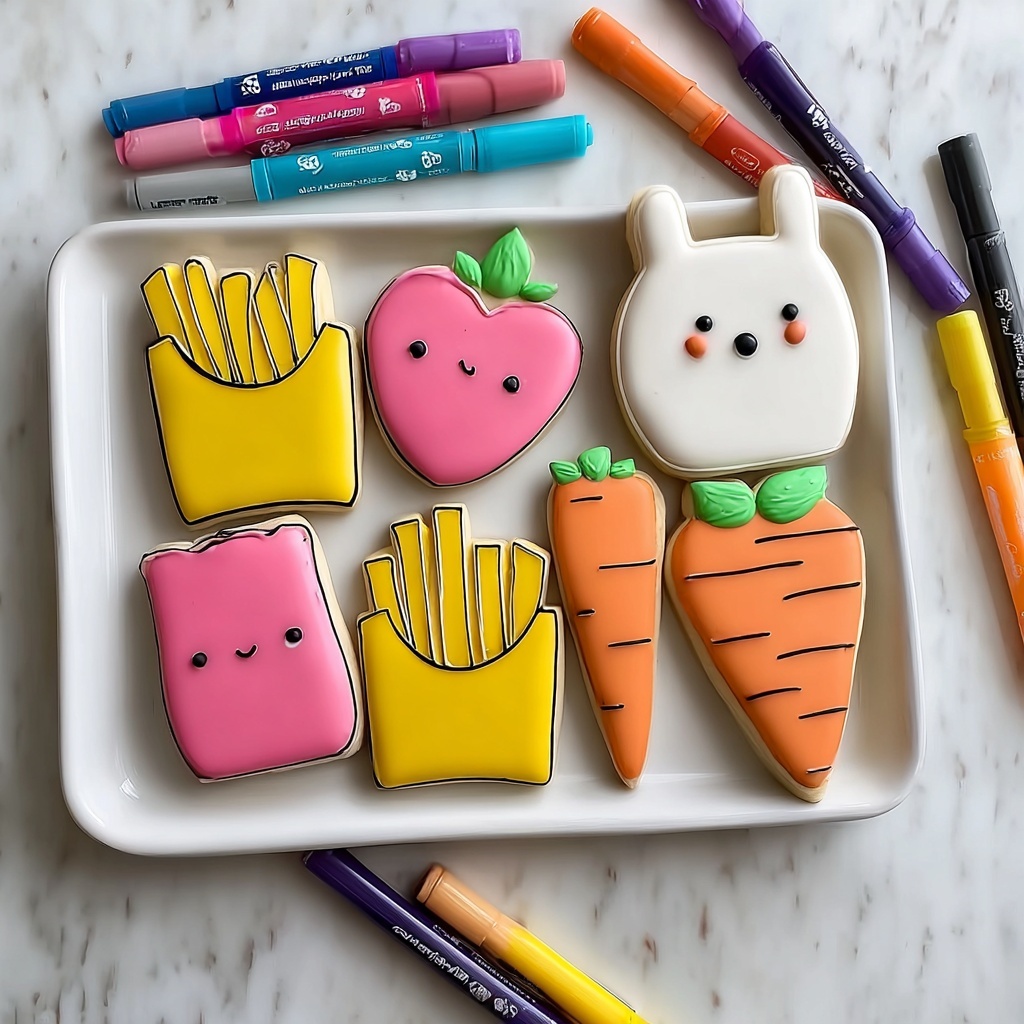
If you’re looking for a delightful treat to kick off the new school year with a sprinkle of happiness, look no further than the Back to School Sugar Cookies That Spark Joy and Creativity Recipe. These cookies are more than just sweet bites; they’re little canvases inviting every baker to unleash their imagination, all while savoring a perfectly tender, buttery base covered with vibrant royal icing. Whether you’re baking with kids eager for a creative project or just want to add some cheer to your lunchbox, this recipe captures the essence of celebration, creativity, and comfort in every single cookie.

Ingredients You’ll Need
Getting the right ingredients together is what lays the foundation for these charming sugar cookies. Each component plays a crucial role — from the softness of butter to the smoothness of royal icing — turning simple pantry staples into a masterpiece.
- 1 cup Unsalted Butter (softened): Essential for that rich, tender crumb; can swap with margarine to keep things dairy-free.
- 1 cup Granulated Sugar: Sweetens perfectly; brown sugar can add a twist of caramel flavor for the adventurous.
- 2 large Eggs: Helps bind everything together; aquafaba makes a great vegan alternative.
- 3 cups All-Purpose Flour: The backbone of the dough; substitute with gluten-free blends if needed.
- 1 tbsp Baking Powder: Gives cookies a gentle rise; baking soda can work too with quantity adjustments.
- 4 cups Powdered Sugar: Key to that smooth, luscious royal icing finish.
- 3 tbsp Meringue Powder: Adds structure to the icing; traditional egg whites work well if preferred.
- 5 tbsp Water: Just enough to create the perfect icing consistency for piping and flooding.
How to Make Back to School Sugar Cookies That Spark Joy and Creativity Recipe
Step 1: Creaming the Butter and Sugar
Begin by creaming together your softened unsalted butter and granulated sugar in a large bowl until the mixture turns light and fluffy. This usually takes about 2 to 3 minutes and is essential to creating that melt-in-your-mouth texture that everyone loves.
Step 2: Incorporating the Eggs
Add the eggs one at a time, mixing thoroughly after each addition. This step ensures your dough will bind beautifully, providing structure without sacrificing tenderness.
Step 3: Combining the Dry Ingredients
Sift the all-purpose flour and baking powder gradually into the wet mixture. Gently mix until just combined—overmixing can lead to tougher cookies, so keep it light and easy.
Step 4: Chilling the Dough
Shape your dough into a neat disc and wrap it tightly with cellophane. Refrigerate for at least an hour to let the flavors meld and to make rolling much easier. This chilling period means less sticky dough and more fun cutting shapes later.
Step 5: Rolling and Cutting
On a floured surface, roll out the chilled dough to about 1/4 inch thickness. Use your favorite cookie cutters to create fun, school-themed shapes—think apples, pencils, or even tiny books! This is the moment where joy really starts to shine.
Step 6: Baking the Cookies
Preheat your oven to 325 degrees Fahrenheit (163 degrees Celsius). Arrange your cutouts on a baking sheet and bake for 8 to 10 minutes until the cookies are puffed and pale. Once baked, cool them on a wire rack completely before decorating.
Step 7: Making and Applying Royal Icing
Mix together powdered sugar, meringue powder, and water to create the royal icing. This icing is perfect because it hardens firmly, allowing your decorations to stay vibrant and intact. Outline each cookie and flood the inside with icing, then let your creativity run wild with colors and designs.
How to Serve Back to School Sugar Cookies That Spark Joy and Creativity Recipe
Garnishes
Enhance these delightful cookies with colorful sprinkles, edible glitter, or tiny candy beads while the icing is still wet. These little touches add sparkle and texture that kids and adults alike will adore. Fresh mint leaves or tiny edible flowers can also bring a whimsical flair for a more elegant presentation.
Side Dishes
Pair your decorated sugar cookies with a cold glass of milk or a warm mug of spiced hot cocoa to create a cozy, comforting snack combo. Alternatively, fruit slices like strawberries or apple wedges offer a fresh contrast to the cookie’s sweet richness, balancing flavors and making the snack feel a bit lighter.
Creative Ways to Present
Package these charming cookies in clear cellophane bags tied with colorful ribbons for a thoughtful back-to-school gift. Arrange them on a tiered platter for parties or lay them out in a themed lunchbox alongside handwritten notes or fun stickers—making the whole experience a celebration of creativity and joy.
Make Ahead and Storage
Storing Leftovers
Store leftover cookies in an airtight container at room temperature to keep them fresh and soft. They typically maintain their best quality for up to one week, making it easy to enjoy them throughout the school week or for an afternoon treat.
Freezing
To preserve these cookies longer, freeze them in layers separated by parchment paper inside a sealed container or freezer bag. When stored properly, they can last up to three months. Just defrost them at room temperature before decorating or enjoying.
Reheating
If you like your cookies slightly warm, reheat them gently in the microwave for 10 to 15 seconds. This softens the cookie just a bit without melting the royal icing, reviving that fresh-baked feel and flavor in an instant.
FAQs
Can I make these cookies dairy-free?
Absolutely! Substitute the unsalted butter with margarine or a plant-based butter. For the eggs, aquafaba works wonderfully as a vegan replacement, ensuring your cookies stay tender and delicious.
How do I get the royal icing to harden properly?
Using meringue powder or egg whites in your icing mix allows it to dry to a firm finish. Let your decorated cookies sit at room temperature uncovered for several hours or overnight to achieve that perfect hardened shell.
Can I use cookie cutters in different shapes?
Yes! Part of the fun with this recipe is designing cookies that suit your theme. School-related shapes are a great idea, but any shape you love will work perfectly with this versatile dough.
What’s the best way to prevent spreading during baking?
Chilling the dough before rolling and cutting helps prevent spreading by solidifying the fats. Also, avoid over-greasing your baking sheet; using parchment paper or silicone mats is ideal for even baking and easy removal.
Can I store decorated cookies for several days before serving?
Yes, as long as you keep them in an airtight container at room temperature. The royal icing will protect the cookies and keep them looking fresh. Just avoid refrigerating as it can cause the icing to sweat or soften.
Final Thoughts
There is something truly magical about sharing the Back to School Sugar Cookies That Spark Joy and Creativity Recipe with family and friends, especially when the year begins. This recipe not only offers a sweet treat but also invites playful expression, turning ordinary baking into a delightful experience. Give these cookies a try—you won’t just bake cookies; you’ll create smiles, memories, and a little sweetness to carry you through the school days ahead.
Print
Back to School Sugar Cookies That Spark Joy and Creativity Recipe
- Prep Time: 20 minutes
- Cook Time: 10 minutes
- Total Time: 1 hour 40 minutes
- Yield: 24 servings
- Category: Dessert
- Method: Baking
- Cuisine: American
- Diet: Vegetarian
Description
These Back to School Sugar Cookies are delightful treats that spark joy and creativity. Soft, buttery sugar cookies are cut into fun shapes and decorated with smooth royal icing, making them perfect for classroom snacks, parties, or festive occasions. The recipe includes vegan and gluten-free substitutions, ensuring everyone can enjoy these colorful cookies.
Ingredients
Cookie Dough Ingredients
- 1 cup Unsalted Butter (softened; substitute with margarine for dairy-free option)
- 1 cup Granulated Sugar (or substitute with brown sugar for a caramel flavor)
- 2 large Eggs (or 3 tbsp aquafaba per egg as a vegan alternative)
- 3 cups All-Purpose Flour (or substitute with gluten-free flour blend)
- 1 tbsp Baking Powder (can substitute with baking soda adjusting the quantity)
Royal Icing Ingredients
- 4 cups Powdered Sugar
- 3 tbsp Meringue Powder (or use egg whites for a traditional version)
- 5 tbsp Water (adjust to achieve desired icing consistency)
Instructions
- Cream Butter and Sugar: In a large mixing bowl, cream together 1 cup of softened unsalted butter and 1 cup of granulated sugar until light and fluffy, which should take about 2 to 3 minutes.
- Add Eggs: Add eggs one at a time to the butter-sugar mixture, mixing thoroughly after each addition to ensure the batter is smooth and well combined.
- Add Dry Ingredients: Gradually sift in 3 cups of all-purpose flour and 1 tablespoon of baking powder. Mix until the ingredients are just combined to avoid overworking the dough.
- Chill Dough: Shape the dough into a disc, wrap it tightly in cellophane wrap, and refrigerate for at least 1 hour to firm up the dough for easier rolling and shaping.
- Roll and Cut Shapes: On a floured surface, roll out the chilled dough to about 1/4 inch thickness. Use cookie cutters to cut into fun shapes appropriate for back-to-school themes.
- Preheat Oven and Bake: Preheat your oven to 325°F (163°C). Place cookies on a baking sheet and bake for 8 to 10 minutes until the cookies are puffed and pale, not browned. Remove and cool on a wire rack.
- Prepare Royal Icing: In a mixing bowl, combine 4 cups powdered sugar, 3 tablespoons meringue powder, and 5 tablespoons of water. Mix well, adjusting water to reach the desired consistency for outlining and flooding the cookies.
- Decorate: Once the cookies are completely cool, use the royal icing to outline and fill each cookie creatively. Allow the icing to set completely before serving or storing.
Notes
- To make these cookies vegan, replace eggs with aquafaba (3 tablespoons per egg) and use margarine instead of butter.
- For a gluten-free version, substitute all-purpose flour with a gluten-free flour blend.
- Adjust baking powder quantity if substituting with baking soda for proper rising.
- Ensure cookies do not brown during baking to keep them soft and chewy.
- Let royal icing dry completely before stacking or packaging cookies to avoid smudges.


