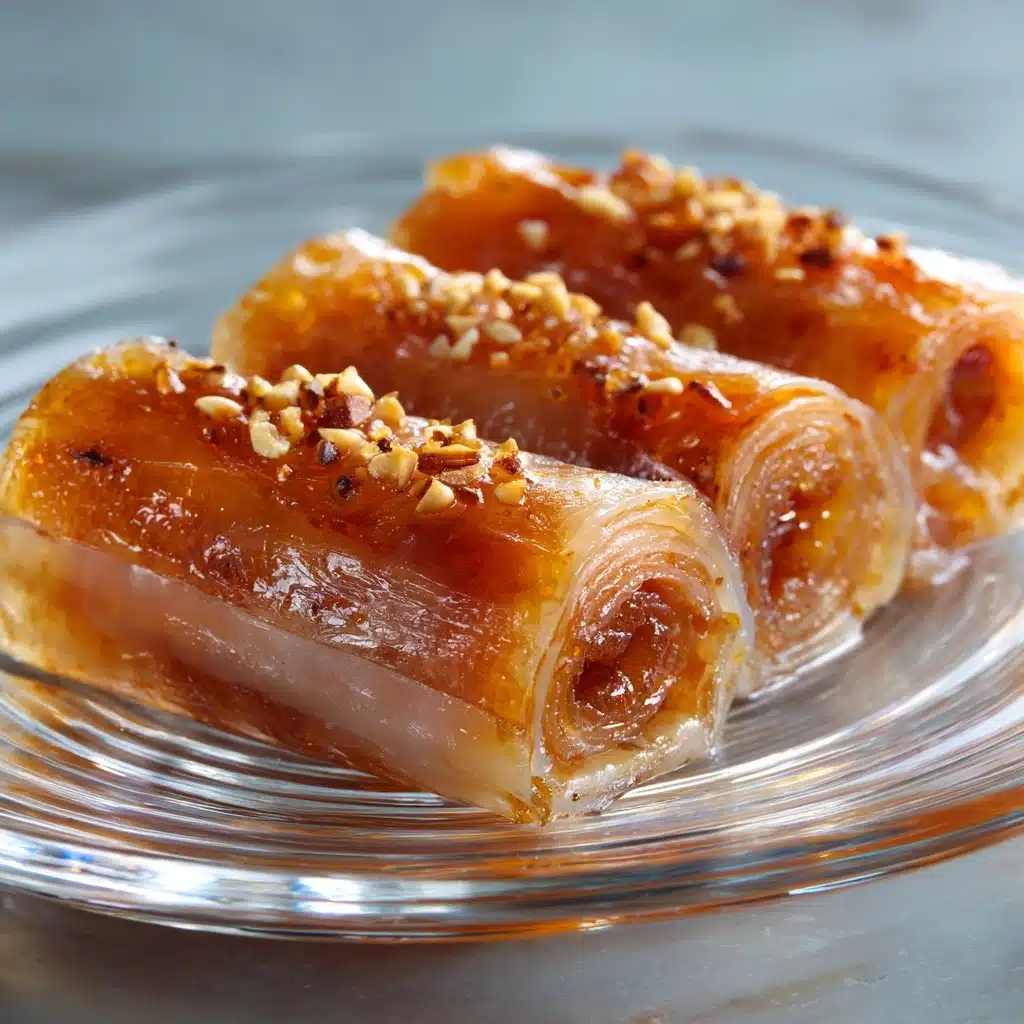
Baked Apple Pie Rice Paper Rolls Recipe
If you dream of apple pie but crave something a little lighter—or a lot more fun—the Baked Apple Pie Rice Paper Rolls will absolutely make your day. Imagine the classic, cinnamon-spiked apple pie flavor you love, all wrapped up in a shatteringly crisp rice paper shell. It’s an easy, healthier twist on an old-fashioned treat, perfect for dessert or as a sweet snack, and impossible not to love. Let’s dive right in and turn simple pantry ingredients into a little magic!
Ingredients You’ll Need
The ingredient list for these Baked Apple Pie Rice Paper Rolls is delightfully short, but each part plays a key role. From juicy apples to the cinnamon’s warmth and the golden crunch outside, every element brings personality and perfection to your dessert.
- Apples: Choose any sweet-tart variety—these are the stars, giving juicy texture and flavor.
- Butter or coconut oil: Just a tablespoon adds richness and carries the spices—both options work beautifully!
- Brown sugar or maple syrup: For those classic caramel notes that bring the filling alive.
- Cinnamon: The heart of apple pie flavor that fills each bite with cozy warmth.
- Nutmeg (optional): A little pinch gives a deeper, bakery-style aroma.
- Lemon juice: Brightens the filling and keeps the apples vibrant.
- Rice paper wrappers: These magical sheets transform the filling into crispy, hand-held treats.
- Melted butter or oil spray: Brushed on top for a golden, crackly finish in the oven.
How to Make Baked Apple Pie Rice Paper Rolls
Step 1: Prepare the Apple Filling
Start by melting your butter (or coconut oil) in a skillet over medium heat. Add those lovely chopped apples, sprinkle in the brown sugar, cinnamon, and nutmeg if you’re using it, then finish with a splash of lemon juice. Stir often, letting everything cook down together for 5 to 6 minutes, until the apples soften and the mixture turns syrupy and irresistible. Take it off the heat and let it cool for a few extra minutes—you don’t want piping hot filling to melt through the wrappers!
Step 2: Soften the Rice Paper Wrappers
Fill a shallow dish with warm water. Give each rice paper wrapper a quick dip (about 10 seconds), just until it’s pliable. They soften quickly, so don’t overdo it—otherwise they can tear. Lay the moistened wrapper flat on a clean surface, ready for filling.
Step 3: Fill and Roll
Spoon about 2 tablespoons of your cooled apple pie filling onto the lower third of each wrapper. Fold in the sides (like you’re starting a burrito!), then roll snugly from the bottom up, tucking everything in tightly. Work gently—rice paper can be delicate when wet, but once you get the hang of it, it’s almost therapeutic.
Step 4: Bake Until Crisp
Line a baking sheet with parchment paper before placing all your filled rolls seam-side down. Give each one a light brush or spray with melted butter or oil to encourage that irresistible golden finish. Bake in a 375°F (190°C) oven for 18 to 20 minutes, flipping the rolls halfway for an even crisp. You’re looking for a golden, lightly blistered surface—pure edible happiness.
Step 5: Serve and Enjoy
Let the Baked Apple Pie Rice Paper Rolls cool for a minute or two (the filling will be hot!), then dive in. The crispy wrapper combined with aromatic, juicy apple filling is like biting into a little parcel of autumn, any time of year.
How to Serve Baked Apple Pie Rice Paper Rolls

Garnishes
For a finishing touch, dust your rolls with extra cinnamon sugar as soon as they come out of the oven. They’ll sparkle and the sugar adds a bonus layer of pop and crunch. Fancy a drizzle? Try a swipe of caramel sauce, a spoonful of vanilla yogurt, or just a flourish of powdered sugar.
Side Dishes
Pairing is part of the fun. These Baked Apple Pie Rice Paper Rolls shine next to a scoop of vanilla ice cream, tangy Greek yogurt, or a handful of toasted nuts. For a snack plate, add a fresh fruit salad or even a small bowl of lightly sweetened whipped cream.
Creative Ways to Present
Stack your rolls on a platter in a crisscross tower for informal snacking or slice them on the diagonal for a fancier look, showing off the gorgeous apple filling. For parties, pop a cocktail stick in each for easy, no-mess picking. Or serve warm in parchment cones, perfect for street-fair vibes at home!
Make Ahead and Storage
Storing Leftovers
If you find yourself with extra Baked Apple Pie Rice Paper Rolls, let them cool completely before transferring to an airtight container. Store them in the refrigerator for up to three days—they’ll keep well, though the wrapper may soften a bit.
Freezing
For longer storage, freeze the cooled rolls on a baking sheet until solid, then transfer to a freezer-safe container or bag. They’ll last up to two months this way. While the texture may change slightly upon thawing, a quick oven reheat will help restore some crispness.
Reheating
To bring your rolls back to life, pop them in a 350°F oven or air fryer for 5 to 8 minutes, until warmed through and the wrapper is crisp again. Avoid the microwave, as it tends to make the rice paper chewy rather than crunchy.
FAQs
Can I use other fruit in place of apples?
Absolutely! Pears, peaches, or even berries can work beautifully. Just keep the fruit pieces small and adjust the sugar and baking time as needed for your chosen filling.
Are these Baked Apple Pie Rice Paper Rolls gluten free?
Yes, rice paper wrappers are naturally gluten free, and as long as your other ingredients are too, you’re set! Always check individual labels if gluten is a concern.
Can I prep these rolls ahead for a party?
Yes, you can make the filling and even assemble the rolls a few hours ahead. Store uncooked rolls covered in the fridge, then bake them off just before serving for maximum crunch.
How do I keep the rolls from sticking to the baking sheet?
Lining your sheet with parchment paper or a silicone baking mat is key. Also, making sure the seam of the roll is facing down helps prevent unravelling and sticking.
What can I do if my rice paper tears while rolling?
Rice paper can be a little delicate! If a wrapper tears, simply patch with another small piece of moistened rice paper or re-roll the filling in a fresh sheet—it happens even to the pros.
Final Thoughts
I can’t wait for you to fall in love with these Baked Apple Pie Rice Paper Rolls as much as I have. Whether you bake them for an autumn gathering or just as a sweet weekday treat, they’re the perfect mix of whimsy, comfort, and fun. Give these a try and let them brighten your next dessert moment!
Print
Baked Apple Pie Rice Paper Rolls Recipe
- Total Time: 35 minutes
- Yield: 8 rolls 1x
- Diet: Vegetarian
Description
These Baked Apple Pie Rice Paper Rolls are a delightful fusion dessert or snack that combines the flavors of apple pie in a crispy, bite-sized package. The sweet apple filling wrapped in rice paper and baked to golden perfection is a treat for any occasion.
Ingredients
Apple Filling:
- 2 medium apples (peeled, cored, and finely chopped)
- 1 tablespoon butter or coconut oil
- 1 tablespoon brown sugar or maple syrup
- 1/2 teaspoon cinnamon
- 1/4 teaspoon nutmeg (optional)
- 1 teaspoon lemon juice
Assembly:
- 8 rice paper wrappers
- Melted butter or oil spray for brushing
Instructions
- Preheat the Oven: Preheat oven to 375°F (190°C) and line a baking sheet with parchment paper.
- Prepare the Apple Filling: In a skillet, melt butter and cook apples, sugar, cinnamon, nutmeg, and lemon juice until soft and syrupy. Let cool.
- Soften the Rice Paper: Dip a wrapper in warm water to soften. Lay flat and add apple filling. Roll tightly like a spring roll.
- Bake the Rolls: Place on baking sheet, brush with butter, and bake for 18–20 minutes until golden and crisp. Serve warm.
Notes
- For extra crunch, sprinkle cinnamon sugar over the rolls before baking.
- Best enjoyed fresh, but leftovers can be reheated in the oven or air fryer.
- Prep Time: 15 minutes
- Cook Time: 20 minutes
- Category: Dessert, Snack
- Method: Baking
- Cuisine: Fusion
Nutrition
- Serving Size: 1 roll
- Calories: 100
- Sugar: 6g
- Sodium: 45mg
- Fat: 3g
- Saturated Fat: 1g
- Unsaturated Fat: 2g
- Trans Fat: 0g
- Carbohydrates: 17g
- Fiber: 1g
- Protein: 1g
- Cholesterol: 5mg


