
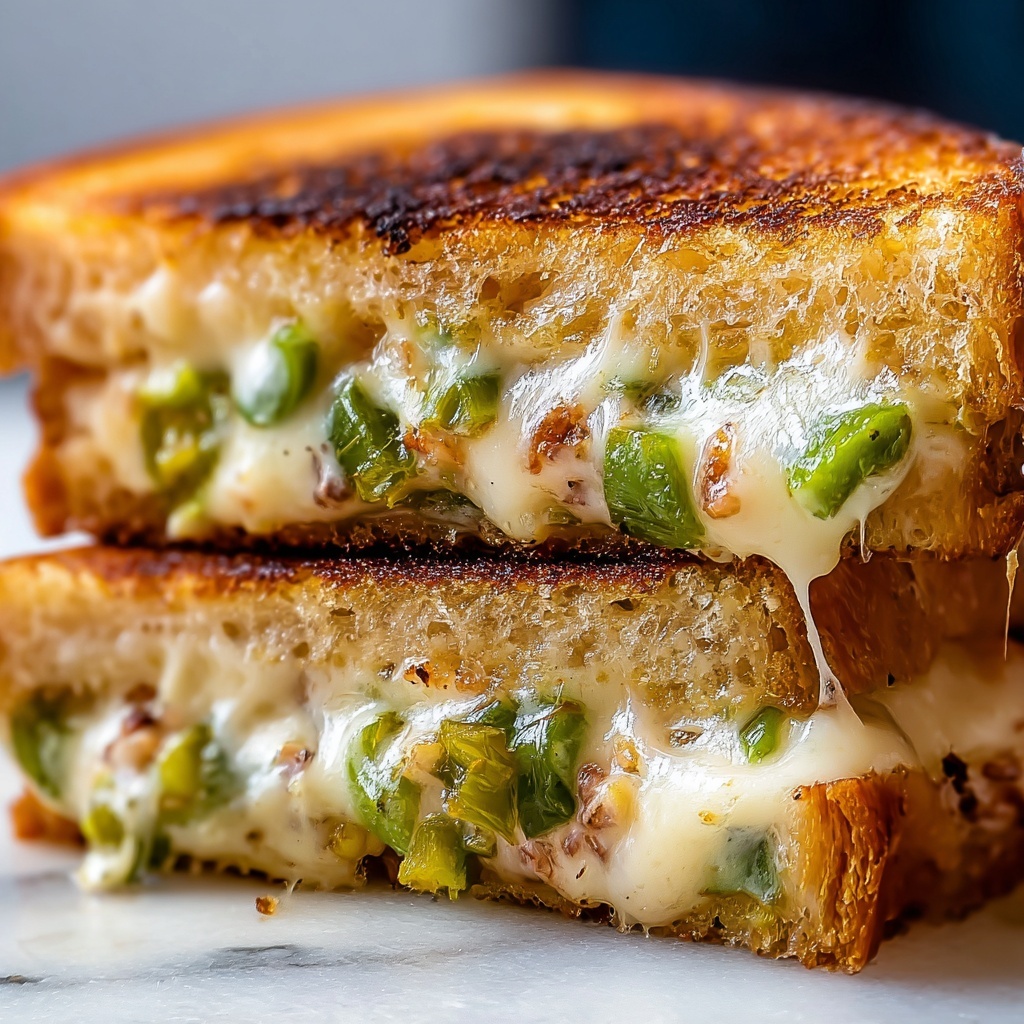
If you are ready to take your grilled cheese experience to a thrilling new level, the Jalapeño Popper Grilled Cheese Recipe is exactly what you need to try next. This sandwich is a dazzling combination of creamy cheese, smoky bacon, and the perfect touch of jalapeño heat, all tucked between crispy golden bread. Every bite offers a warm, spicy hug, making it an irresistible comfort food that’s both familiar and exciting. If you love a grilled cheese with character, this recipe will quickly become one of your absolute favorites to make and share.
Ingredients You’ll Need
The beauty of this Jalapeño Popper Grilled Cheese Recipe lies in its simple yet essential ingredients. Each one plays a crucial role in layering flavors, textures, and colors that make this sandwich unforgettable.
- Sturdy bread: Use sourdough or Texas toast for the perfect base that crisps up without sogginess.
- Cream cheese: Softened to creamy perfection, it forms the rich, smooth base of the filling.
- Sharp cheddar cheese: Shredded for meltability and bold flavor, balancing the cream cheese.
- Fresh jalapeños: Finely diced with seeds removed to add just the right amount of heat without overwhelming.
- Garlic powder or fresh garlic: Adds a subtle aromatic punch that elevates the cheesy filling.
- Crispy cooked bacon: Brings a smoky crunch that contrasts beautifully with the creamy cheese.
- Butter: Generously spread on the outside of the bread for that golden, irresistible crust.
How to Make Jalapeño Popper Grilled Cheese Recipe
Step 1: Prepare the jalapeño popper filling
Begin by finely dicing the jalapeños, making sure to remove the seeds if you prefer less heat. In a mixing bowl, combine the softened cream cheese, shredded sharp cheddar, jalapeños, and garlic powder until everything is evenly mixed into a luscious, creamy filling that’s packed with flavor and just the right kick.
Step 2: Assemble the sandwich
Spread a generous layer of the jalapeño popper mixture evenly over one slice of your chosen bread. If you’re including bacon, layer the crispy strips over the cheese spread to add a smoky, salty crunch. Top with the second slice of bread, pressing down gently to help it all stick together.
Step 3: Butter the bread
Use softened butter to coat the outside of each bread slice thoroughly. This is key to achieving that glorious golden-brown crust that makes every bite crunchy and packed with buttery flavor.
Step 4: Grill to perfection
Heat a skillet over medium-low heat and carefully place the sandwich in the pan. Cook slowly for 3 to 4 minutes per side, pressing down gently to promote even browning and ensure that the cheese inside melts beautifully. The low heat is essential to avoid burning the bread while allowing the filling to reach the ideal gooey consistency.
Step 5: Serve warm
Once both sides are a deep golden brown and the cheese is melted through, remove the sandwich from the skillet. Let it rest for a minute to let the cheese set slightly—this step helps avoid a messy ooze when slicing.
How to Serve Jalapeño Popper Grilled Cheese Recipe

Garnishes
A sprinkle of fresh chopped cilantro or a light drizzle of creamy ranch dressing can beautifully complement the spicy, cheesy goodness of the Jalapeño Popper Grilled Cheese Recipe. For a final touch, a few thin jalapeño slices on top add color and an extra burst of heat.
Side Dishes
This sandwich pairs wonderfully with classic sides like crunchy dill pickles or a fresh garden salad to balance its richness. Crispy sweet potato fries or a tangy coleslaw also make fantastic accompaniments, rounding out your meal perfectly.
Creative Ways to Present
Try cutting the sandwich into fun shapes like triangles or fingers to make it easy for sharing at a casual gathering. You can also jazz it up by serving it open-faced with a topping of extra melted cheddar and jalapeño slices broiled briefly for an impressive presentation.
Make Ahead and Storage
Storing Leftovers
Leftover Jalapeño Popper Grilled Cheese Recipe sandwiches can be stored tightly wrapped in the refrigerator for up to 2 days. Keep them wrapped well to maintain moisture and prevent them from drying out.
Freezing
For longer storage, wrap the assembled, un-grilled sandwiches in plastic wrap and then foil before freezing. They can last up to 1 month in the freezer. When ready to enjoy, thaw in the refrigerator overnight before grilling as usual.
Reheating
Reheat leftovers in a skillet over low heat to regain the crispy crust and melt the cheese evenly. Avoid microwaving, which tends to make the bread soggy and the texture less enjoyable.
FAQs
Can I adjust the heat level in the Jalapeño Popper Grilled Cheese Recipe?
Absolutely! Removing the jalapeño seeds significantly reduces the spiciness, and you can always add or reduce the number of jalapeños according to your heat preference. For a milder version, substitute with mild peppers or leave them out entirely.
What type of bread works best for this grilled cheese?
Sturdy breads such as sourdough or Texas toast are ideal because they hold up well during grilling and provide a crunchy, flavorful crust without becoming soggy from the cheese filling.
Can I make this vegetarian?
Yes! Simply omit the bacon, and you’ll still get tons of flavor from the creamy cheese and spicy jalapeños. Adding some roasted red peppers or sautéed mushrooms can add another layer of deliciousness.
What if I don’t have cream cheese?
Cream cheese is essential to get that smooth texture, but if you don’t have it on hand, ricotta or mascarpone can be a good substitute, though the flavor will be slightly different. Just be sure to soften them before mixing with the other ingredients.
Is it possible to prepare the filling ahead of time?
Definitely! The jalapeño popper filling can be made up to 24 hours in advance and stored in an airtight container in the fridge. This makes assembly quick and easy when you’re ready to make the sandwich.
Final Thoughts
There is something truly special about the Jalapeño Popper Grilled Cheese Recipe that brings comfort, spice, and joy all at once. Whether you’re looking for a fun twist on the classic grilled cheese or craving a cozy meal full of bold flavors, this recipe delivers. I encourage you to give it a try, experiment with your own tweaks, and most importantly, enjoy every gooey, crispy bite with friends or family!
Print
Jalapeño Popper Grilled Cheese Recipe
- Prep Time: 10 minutes
- Cook Time: 8 minutes
- Total Time: 18 minutes
- Yield: 2 servings
- Category: Sandwich
- Method: Stovetop
- Cuisine: American
Description
A spicy and creamy twist on the classic grilled cheese sandwich, featuring a jalapeño popper-inspired filling with cream cheese, sharp cheddar, fresh jalapeños, and crispy bacon, grilled to golden perfection for a melty, flavorful meal.
Ingredients
Bread
- 4 slices sturdy bread (such as sourdough or Texas toast)
Filling
- 4 oz softened cream cheese
- 1 cup shredded sharp cheddar cheese
- 1–2 fresh jalapeños, finely diced (seeds removed for less heat)
- 1/4 teaspoon garlic powder (or 1 clove fresh garlic, minced)
- 4 slices cooked crispy bacon
Butter
- Butter, enough to thoroughly butter each slice of bread
Instructions
- Prepare the jalapeño popper filling: Finely dice the jalapeños and mix them with the softened cream cheese, shredded cheddar, and garlic powder until well combined to create a creamy and spicy filling.
- Assemble the sandwich: Spread a generous layer of the jalapeño popper mixture evenly onto one slice of bread. If using bacon, layer the cooked bacon strips on top, then cover with the second slice of bread.
- Butter the bread: Butter the outside of each slice of bread thoroughly to ensure a golden, crispy crust when grilled.
- Grill to perfection: Heat a skillet over medium-low heat. Place the sandwich in the pan and cook slowly for about 3-4 minutes per side, pressing gently, until both sides are deep golden brown and the cheese has melted throughout.
- Serve warm: Remove the sandwich from the skillet and let it rest for a minute before slicing to help the cheese set slightly and reduce mess.
Notes
- Remove jalapeño seeds to reduce heat if desired.
- Cook bacon until crispy before adding to the sandwich.
- Use medium-low heat to avoid burning the bread and ensure cheese melts perfectly.
- Let the sandwich rest for a minute after grilling to make slicing easier.


