
If you have a fondness for desserts that blend creamy richness with a hint of natural sweetness, then the Japanese Sweet Potato Crème Brûlée Recipe is about to become your new favorite treat. This delightful fusion transforms humble Japanese sweet potatoes into a luscious custard base that’s perfectly balanced by the signature crackly caramelized sugar top. Imagine the smoky sweetness of roasted sweet potatoes mingling with velvety custard and the satisfying crunch of brûléed sugar—it’s comfort, elegance, and a dash of surprise all in one unforgettable bite.
Ingredients You’ll Need
This Japanese Sweet Potato Crème Brûlée Recipe calls for a handful of well-chosen ingredients that play essential roles in creating a perfectly smooth, flavorful dessert. Each component contributes to texture, taste, or presentation, combining to create a luxuriously creamy custard encased in natural sweetness.
- Japanese sweet potatoes: These provide a uniquely sweet and earthy base with a gorgeous vibrant hue after roasting.
- Sugar: Used twice—once to sweeten the custard and again to create that iconic caramelized, crunchy layer on top.
- Egg yolks: The rich foundation for thickening your custard to that silky-smooth consistency.
- Cornstarch: Helps stabilize the custard, preventing it from curdling and ensuring perfect creaminess.
- Salt: Just a pinch enhances all the flavors without overpowering the natural sweetness.
- Milk: Adds creaminess while balancing the dense richness of the sweet potatoes and yolks.
- Unsalted butter: Enriches the custard and gives it a luscious mouthfeel.
- Vanilla extract: A fragrant note that complements the roasted sweet potato beautifully.
- Caster or granulated sugar: For sprinkling on top before caramelizing to form the signature brûlée crust.
How to Make Japanese Sweet Potato Crème Brûlée Recipe
Step 1: Roast the Sweet Potatoes
Preheat your oven to 392°F (200°C) and carefully wrap each medium Japanese sweet potato in foil. Roasting them for about 1 hour and 10 minutes until fork-tender brings out their natural sweetness and softens the flesh perfectly. This step is crucial because it forms the flavorful base that sets this recipe apart.
Step 2: Prepare the Custard Base
While the sweet potatoes roast, combine ⅔ cup sugar, cornstarch, and salt in a saucepan. Gradually whisk in 3 cups of milk, making sure to dissolve any lumps before heating over medium flame. Keep whisking until the mixture thickens to a desirable custard-like consistency—this thickened milk mixture is the essence of your creamy filling.
Step 3: Temper the Egg Yolks
In a separate bowl, lightly beat 3 egg yolks. To avoid scrambling the eggs, slowly add about ¼ cup of the hot milk mixture to the yolks while whisking vigorously. This careful tempering step ensures a smooth texture and prevents any unwanted curdling later on.
Step 4: Cook the Custard
Return the yolk and milk mixture back into the saucepan. Continue cooking over low to medium heat for an additional 2 minutes until the custard thickens further. This process deepens the creaminess and sets the perfect stage for the next delicious steps.
Step 5: Enrich Your Custard
Once off the heat, stir in 2 tablespoons of unsalted butter and 1 teaspoon of vanilla extract until the custard becomes velvety smooth. These additions enhance both flavor and texture, giving the custard a luxurious finish.
Step 6: Cool the Custard
Transfer the warm custard to a bowl and cover it with plastic wrap pressed directly onto the surface to prevent a skin from forming. Let it come to room temperature while your sweet potatoes finish roasting and cooling.
Step 7: Hollow the Sweet Potatoes
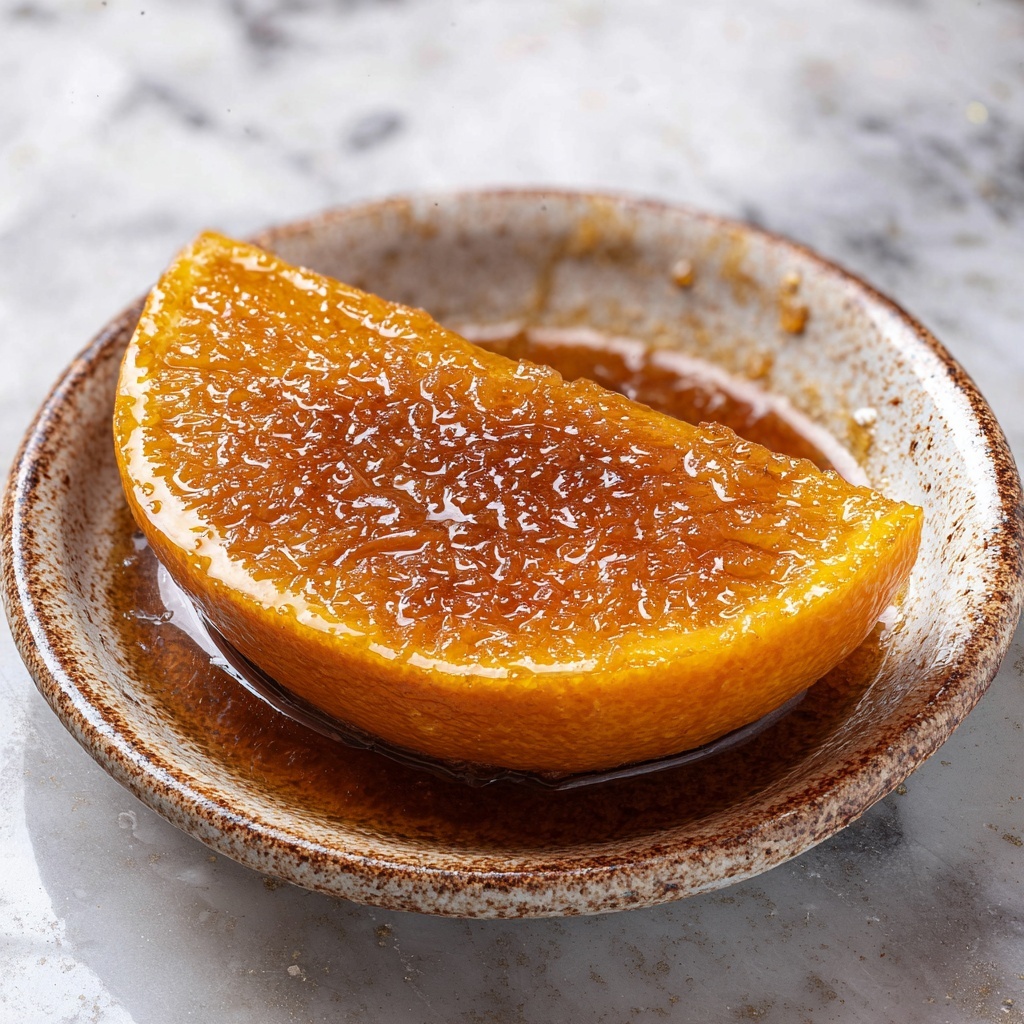
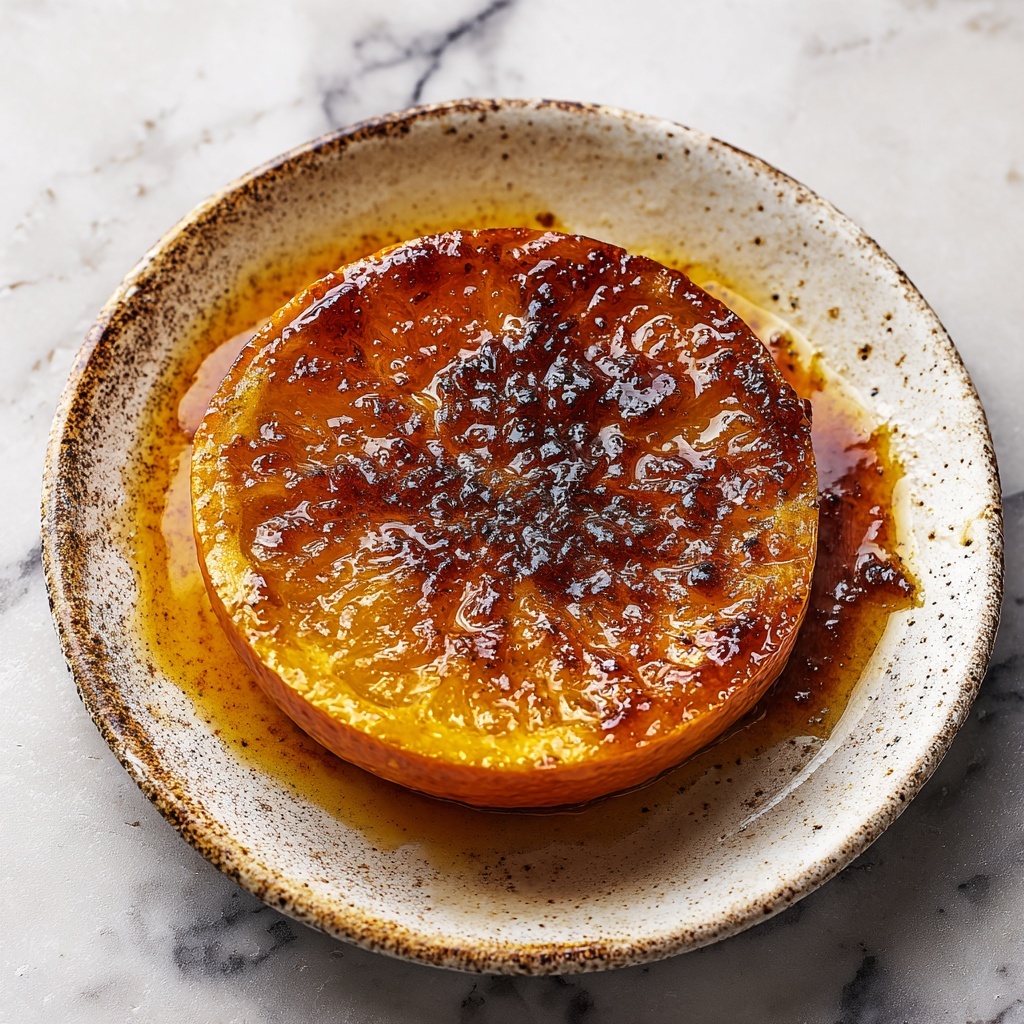
After letting the sweet potatoes cool for about 10 minutes, slice off the tops and carefully scoop out roughly one-third of the flesh from each, creating a natural bowl. These hollowed sweet potatoes will house the creamy custard filling, making each bite a perfect blend of textures.
Step 8: Fill with Custard and Sugar
Evenly spoon the cooled custard into each sweet potato shell. Then generously sprinkle about one teaspoon of sugar on top of the custard, this will become your brûlée topping.
Step 9: Caramelize the Sugar
Using a kitchen torch, carefully caramelize the sugar until it melts into a deep amber and forms a crunchy, bubbly crust. Allow the sugar to harden for a minute or two before serving to enjoy that signature caramel crack with every spoonful.
How to Serve Japanese Sweet Potato Crème Brûlée Recipe
Garnishes
A simple dusting of cinnamon or a few toasted sesame seeds can add a subtle aromatic layer to the dessert. Alternatively, a sprig of fresh mint or a light drizzle of honey can brighten the presentation while complementing the custard’s sweetness.
Side Dishes
This dessert pairs beautifully with light accompaniments such as fresh berries or a scoop of mild green tea ice cream. The contrasting coolness and slight bitterness of the ice cream balance the rich, caramelized custard in an irresistibly harmonious way.
Creative Ways to Present
For a more elegant presentation at gatherings, serve the filled sweet potatoes on individual small plates, sprinkled with edible flowers or crushed pistachios for a pop of color and texture. You could also portion the custard into ramekins and top each with caramelized sugar and a small piece of roasted sweet potato for an innovative twist on this Japanese Sweet Potato Crème Brûlée Recipe.
Make Ahead and Storage
Storing Leftovers
Keep any leftover filled sweet potatoes covered tightly with plastic wrap or in an airtight container in the refrigerator. They will stay fresh and delicious for up to three days, though the crème brûlée texture is best enjoyed fresh.
Freezing
This dessert is not ideal for freezing due to the custard’s delicate texture, which can separate upon thawing. For best results, prepare fresh batches or store in the fridge only.
Reheating
If you prefer a warm dessert, gently reheat the custard-filled sweet potatoes in a low-temperature oven until just warm. Avoid microwaving as it tends to affect the texture. Re-caramelizing the sugar topping with a torch after reheating will restore that signature crunch.
FAQs
Can I use regular sweet potatoes instead of Japanese sweet potatoes?
While you can substitute regular sweet potatoes, Japanese sweet potatoes have a uniquely sweet, moist texture and a beautiful color that make this recipe stand out. Using them enhances authenticity and flavor, but regular varieties will work in a pinch.
Is there a way to make this recipe vegan?
To create a vegan version, you would need to replace the milk with a plant-based alternative and use a vegan butter substitute. Additionally, eggs could be substituted with silken tofu or a commercial egg replacer, but results might differ in texture and flavor.
What type of sugar is best for the caramelized topping?
Caster (superfine) sugar is ideal because it melts quickly and evenly, forming a smooth caramel crust. Granulated sugar is an acceptable alternative but may require a bit more attention during caramelizing to avoid uneven burning.
Can I prepare the custard ahead and assemble later?
Absolutely! The custard can be made ahead and refrigerated for up to 24 hours. Assemble the sweet potatoes just before serving, caramelize the sugar topping last minute for the best crunch and presentation.
What’s the secret to a perfect crack on the brûlée crust?
Use a kitchen torch to caramelize the sugar evenly and ensure the sugar layer is not too thick or too thin. Let the caramel cool and harden fully before tapping with your spoon—this creates the satisfying crack that makes this dessert so fun!
Final Thoughts
There is something truly special about the Japanese Sweet Potato Crème Brûlée Recipe that brings a cozy, yet elegant touch to any occasion. Its blend of roasted sweetness, rich custard, and crispy caramel topping offers a dessert experience like no other. I warmly encourage you to try this recipe, whether as a weekend treat or a dazzling finale for your next dinner party—you’re going to love every spoonful.
Print
Japanese Sweet Potato Crème Brûlée Recipe
- Prep Time: 15 minutes
- Cook Time: 1 hour 15 minutes
- Total Time: 1 hour 30 minutes
- Yield: 7 servings
- Category: Dessert
- Method: Baking
- Cuisine: Japanese
Description
This Japanese Sweet Potato Crème Brûlée combines the creamy richness of traditional crème brûlée custard with the natural sweetness and earthy flavor of roasted Japanese sweet potatoes. Perfectly roasted sweet potatoes are hollowed and filled with a smooth vanilla-infused custard, then topped with caramelized sugar for a delightful crackling crust. A unique twist that balances velvety texture and caramel crunch, ideal as an elegant dessert for gatherings.
Ingredients
Sweet Potatoes
- 7 medium Japanese sweet potatoes
Custard
- ⅔ cup sugar
- 3 egg yolks (omega-3 enriched recommended)
- ¼ cup cornstarch
- ¼ tsp salt
- 3 cups milk
- 2 tbsp unsalted butter
- 1 tsp vanilla extract
For Caramelizing
- ¼ cup sugar (caster or granulated) for caramelizing
Instructions
- Roast Sweet Potatoes: Preheat the oven to 392°F (200°C). Wrap each Japanese sweet potato individually in foil and roast them for 1 hour and 10 minutes, or until they are completely tender when pierced with a fork.
- Prepare Custard Base: Meanwhile, in a medium saucepan, combine ⅔ cup sugar, ¼ cup cornstarch, and ¼ tsp salt. Gradually whisk in 3 cups of milk, ensuring there are no lumps. Heat the mixture over medium heat, whisking constantly until it thickens and becomes smooth.
- Temper Egg Yolks: Lightly beat the 3 egg yolks in a separate bowl. Slowly add about ¼ cup of the hot milk mixture into the yolks, whisking constantly to temper them and prevent scrambling.
- Combine and Thicken Custard: Pour the tempered yolk mixture back into the saucepan with the remaining milk mixture. Cook for an additional 2 minutes over medium heat while whisking continuously until the custard thickens further.
- Add Flavor and Finish Custard: Remove the saucepan from heat, then stir in 2 tablespoons unsalted butter and 1 teaspoon vanilla extract until fully incorporated and smooth.
- Cool Custard: Transfer the custard to a bowl and cover it tightly with plastic wrap pressed directly onto the surface to prevent a skin from forming. Let it cool to room temperature.
- Prepare Sweet Potatoes for Filling: When the roasted sweet potatoes have cooled for about 10 minutes, cut the tops off each potato. Carefully scoop out approximately one-third of the flesh from each to create space for the custard filling.
- Fill Sweet Potatoes: Evenly spoon the cooled custard into the hollowed-out sweet potatoes, filling them to the top.
- Caramelize Sugar Topping: Sprinkle about 1 teaspoon of caster or granulated sugar evenly over the custard surface of each filled sweet potato. Use a kitchen torch to caramelize the sugar until it melts, bubbles, and turns a dark amber color, forming a crisp crust.
- Serve: Allow the caramelized sugar topping to harden for a few minutes before serving. Enjoy the unique blend of creamy custard, sweet potato, and crunchy caramel.
Notes
- Omega-3 enriched egg yolks enhance the nutritional value but can be substituted with regular egg yolks.
- If you do not have a kitchen torch, you can place the sweet potatoes under a broiler for a few minutes but watch carefully to avoid burning.
- Use Japanese sweet potatoes specifically for their natural sweetness and firm texture.
- Ensure the custard is cool before filling the sweet potatoes to maintain structure and safety.
- Store leftovers covered in the refrigerator and consume within 2 days; re-crisp the sugar topping with a kitchen torch before serving.


