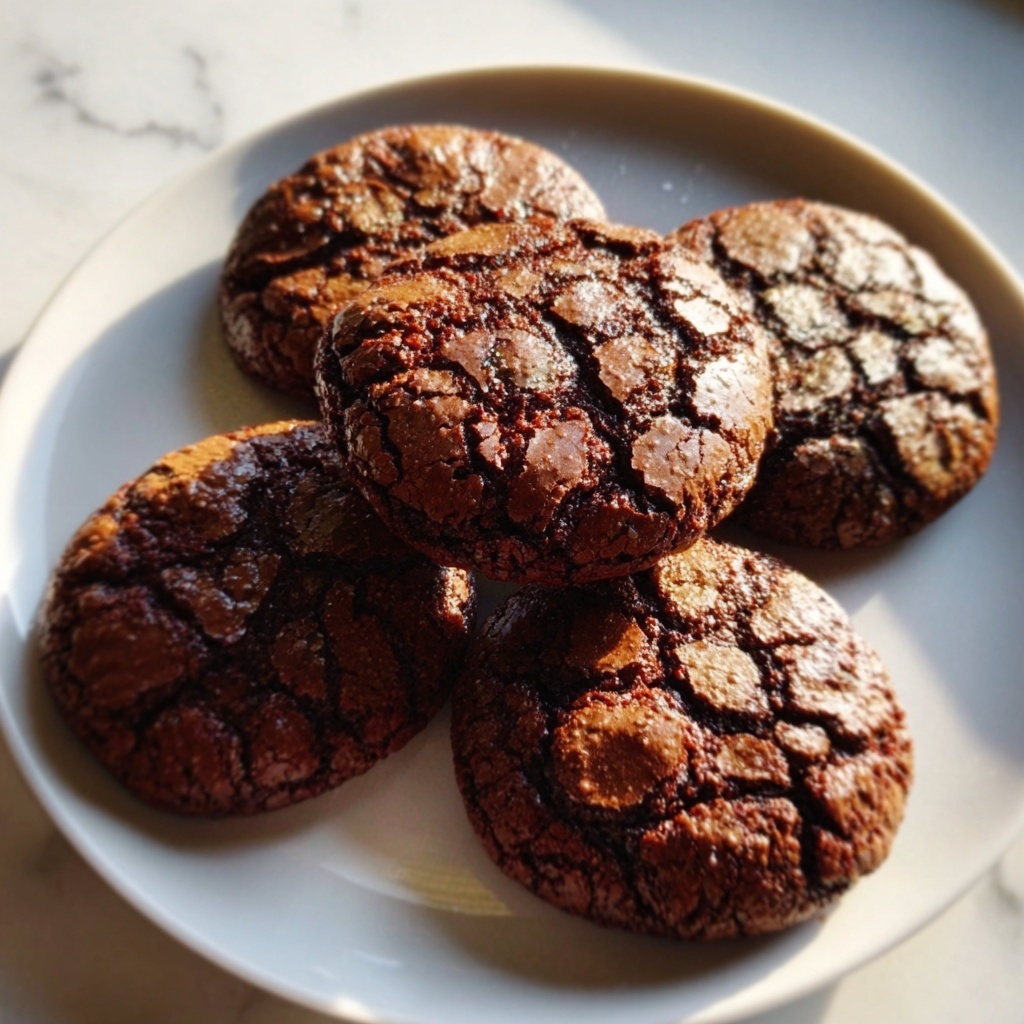
If you’re looking for a festive treat that combines rich chocolate flavor with a delightfully crisp texture, you have to try the Christmas Chocolate Wafers: 7 Joyful Secrets to Perfection Recipe. These charming little wafers bring holiday magic to your kitchen with every bite, offering a perfect balance between cocoa goodness and buttery tenderness. Whether you’re baking for a crowd or a cozy family night, this recipe is your go-to for creating a sweet sensation that feels like a warm hug in cookie form.

Ingredients You’ll Need
The magic behind these Christmas Chocolate Wafers lies in their simple but powerful ingredients. Each component plays a vital role, enhancing flavor, texture, and that irresistible chocolaty glow that makes them so special.
- 1 cup all-purpose flour: The base that gives the wafers structure and perfect chewiness.
- 1/2 cup cocoa powder: Adds deep chocolate richness and that festive brown color everyone loves.
- 1/2 cup sugar: Sweetens the wafers just right, balancing the cocoa’s slight bitterness.
- 1/2 cup unsalted butter, softened: Provides creaminess and helps create a melt-in-the-mouth texture.
- 1/4 cup milk: Adds moisture so the wafers stay tender and don’t dry out.
- 1 tsp vanilla extract: Elevates the chocolaty flavor with its warm, inviting aroma.
- 1/2 tsp baking powder: Helps the wafers rise slightly, keeping them crisp but not too dense.
How to Make Christmas Chocolate Wafers: 7 Joyful Secrets to Perfection Recipe
Step 1: Preheat Your Oven
Start by setting your oven to 350°F (175°C). Getting the temperature just right is key to baking those wafers evenly with a delightful crisp edge and tender center.
Step 2: Combine Dry Ingredients
In a mixing bowl, whisk together the flour, cocoa powder, sugar, and baking powder. This dry mix is what gives the wafers their chocolatey base and subtle lift, so blending well ensures even flavor throughout.
Step 3: Add the Wet Ingredients
Next, add the softened butter, milk, and vanilla extract to your dry ingredients. Mixing these gently but thoroughly will produce a smooth dough that promises lightness and moisture in every wafer.
Step 4: Scoop and Shape
Using a tablespoon, portion out the batter onto a baking sheet lined with parchment paper. Leave some space between each mound; this helps them spread just enough without merging, making perfectly shaped wafers.
Step 5: Bake to Perfection
Bake for 10 to 12 minutes until the edges look set and slightly firm. This timing is crucial because it locks in the crispness while keeping the centers tender — the very essence of the Christmas Chocolate Wafers: 7 Joyful Secrets to Perfection Recipe.
Step 6: Cool Before Enjoying
Once out of the oven, let your wafers cool on the baking sheet for a few minutes. As they cool, they firm up and develop that satisfying crunch you dream about.
How to Serve Christmas Chocolate Wafers: 7 Joyful Secrets to Perfection Recipe

Garnishes
Elevate these wafers with a dusting of powdered sugar or a drizzle of melted white chocolate for a festive touch. You can also sprinkle crushed peppermint candy over the top to add a refreshing zing and a splash of holiday color.
Side Dishes
These wafers pair beautifully with a warm cup of spiced hot chocolate or freshly brewed coffee. For a fun holiday dessert platter, serve alongside whipped cream and fresh berries — the contrast in flavors is absolutely divine.
Creative Ways to Present
Stack your wafers in a clear glass jar tied with a red ribbon as a charming gift or create layered dessert cups with alternating layers of crushed wafers and whipped cream. Both ideas turn this simple treat into an eye-catching centerpiece for your holiday celebrations.
Make Ahead and Storage
Storing Leftovers
Keep your Christmas Chocolate Wafers in an airtight container at room temperature for up to a week. This preserves their crispness and rich chocolate flavor so you can enjoy them at your leisure without worrying about them going stale.
Freezing
If you want to save some for later, these wafers freeze beautifully. Place them in a single layer on a baking sheet to freeze first, then transfer to a freezer-safe container. They’ll stay fresh for up to three months and thaw quickly when needed.
Reheating
To revive their original crispness, pop the wafers in a preheated oven at 300°F for about 5 minutes. This gentle reheating refreshes their texture without drying them out — perfect for enjoying leftovers like freshly baked treats.
FAQs
Can I use dark chocolate instead of cocoa powder?
While dark chocolate can add a richer flavor, it might affect the texture and sweetness balance. Cocoa powder keeps the wafers light and airy, but melting dark chocolate and mixing it in could be an interesting twist if you adjust sugar accordingly.
Are these wafers gluten-free?
As written, this recipe uses all-purpose flour which contains gluten. However, you can try substituting a gluten-free flour blend, making sure it includes xanthan gum or another binder to keep the wafers from falling apart.
Can I make these wafers vegan?
Yes! Substitute the butter with a vegan margarine or coconut oil, use plant-based milk like almond or oat milk, and ensure your sugar is vegan-friendly. The texture might vary slightly, but the taste will still be festive and delicious.
How thin or thick should the wafers be before baking?
Using a tablespoon scoop helps control size, but a little spread on the baking tray is natural. Aim for about 1/4 inch thickness after spreading on the sheet so they bake crisp but don’t get too hard.
Can I add nuts or other mix-ins?
Absolutely! Chopped nuts, mini chocolate chips, or dried cranberries can add wonderful texture and festive flavor. Just fold them gently into the batter before scooping to keep the wafers uniform and perfect.
Final Thoughts
These Christmas Chocolate Wafers: 7 Joyful Secrets to Perfection Recipe truly capture the spirit of the season with their incredible chocolate flavor and delightful crispness. They’re easy to make, fun to share, and just waiting for you to add your own personal touch. Give this recipe a try and watch how it quickly becomes a beloved holiday staple in your kitchen!
Print
Christmas Chocolate Wafers: 7 Joyful Secrets to Perfection Recipe
- Prep Time: 10 minutes
- Cook Time: 12 minutes
- Total Time: 22 minutes
- Yield: 24 servings
- Category: Dessert
- Method: Baking
- Cuisine: American
Description
Discover the delightful recipe for Christmas Chocolate Wafers that combines rich cocoa and a tender crumb to create the perfect festive treat. These easy-to-make wafers are baked to perfection with a soft, buttery texture and a hint of vanilla, ideal for holiday gatherings or gifting.
Ingredients
Dry Ingredients
- 1 cup all-purpose flour
- 1/2 cup cocoa powder
- 1/2 cup sugar
- 1/2 tsp baking powder
Wet Ingredients
- 1/2 cup unsalted butter, softened
- 1/4 cup milk
- 1 tsp vanilla extract
Instructions
- Preheat the Oven. Begin by setting your oven to 350°F (175°C) to ensure it reaches the correct temperature while you prepare the batter.
- Combine Dry Ingredients. In a large mixing bowl, whisk together the all-purpose flour, cocoa powder, sugar, and baking powder thoroughly to distribute all dry components evenly.
- Add Wet Ingredients and Mix. Incorporate the softened unsalted butter, milk, and vanilla extract into the dry mixture. Stir continuously until a smooth, cohesive dough forms without lumps.
- Portion Onto Baking Sheet. Using a tablespoon, scoop out small portions of the dough and place them spaced apart on a baking sheet lined with parchment paper or a silicone mat to prevent sticking.
- Bake the Wafers. Place the baking sheet in the preheated oven and bake for 10 to 12 minutes. Keep an eye on the wafers to avoid overbaking; they should be set but still soft in the center.
- Cool Before Serving. Remove the baking sheet from the oven and let the wafers cool completely on a wire rack to allow them to set and develop their texture perfectly before serving.
Notes
- Ensure the butter is softened, not melted, for the best dough consistency.
- You can add a pinch of salt to balance the sweetness if desired.
- For a festive touch, sprinkle with powdered sugar or dip in melted white chocolate after cooling.
- Store wafers in an airtight container at room temperature for up to 5 days.
- Milk can be substituted with a dairy-free alternative to accommodate lactose intolerance.


